Top 9 Best Gutter Cleaning Tools to Make Your Life Easier

Gutters play a crucial role in protecting your home from water damage, but maintaining them can be a daunting task. Regular gutter cleaning helps prevent clogs and ensures that water flows freely away from your property.

In this article, we’ve compiled a list of the top 9 gutter cleaning tools, perfect for DIY homeowners and professionals alike. Each of these tools can help you tackle gutter cleaning with ease and efficiency.

Best Gutter Cleaning Tools

1. Orbit 58543 Telescoping Gutter Cleaning Wand

The Orbit 58543 Telescoping Gutter Cleaning Wand is an affordable and effective solution for cleaning gutters from the ground. Its extendable design allows you to reach gutters up to 12 feet high without the need for a ladder. The wand features a rotating nozzle, allowing you to blast away leaves, dirt, and debris with a powerful stream of water. It also has a comfortable grip and a non-slip handle for easy use.


View on Amazon

2. The Gutter Tool – Gutter Cleaning Spoon and Scoop

For those who prefer a simple and hands-on approach to gutter cleaning, the Gutter Tool – Gutter Cleaning Spoon and Scoop is a must-have. This lightweight tool features a unique spoon and scoop design, allowing you to easily remove leaves, dirt, and debris from your gutters. Its ergonomic handle ensures comfortable use, while the durable construction guarantees long-lasting performance.


View on Amazon

3. WORX WA4092 Universal Fit Gutter Cleaning Kit

The WORX WA4092 Universal Fit Gutter Cleaning Kit is designed to work with any leaf blower, making it a versatile option for homeowners with existing tools. This kit features an 11-foot extendable hose and attachments that can clean gutters up to two stories high. The lightweight design ensures easy maneuverability, while the angled tube ensures optimal airflow for efficient debris removal.


View on Amazon

4. Toro 51667 Gutter Cleaning Kit

Designed specifically for use with Toro leaf blowers, the Toro 51667 Gutter Cleaning Kit is an effective and easy-to-use solution for maintaining your gutters. This kit includes five extension tubes, a gutter nozzle, and a connection collar, providing a reach of up to 12 feet. The angled design ensures efficient debris removal, while the easy-to-assemble components make setup a breeze.


View on Amazon

5. Ladder-Max Stand-Off Stabilizer

While not a gutter cleaning tool per se, the Ladder-Max Stand-Off Stabilizer is an essential accessory for those who prefer to clean gutters using a ladder. This stabilizer attaches to the top of your ladder, providing added stability and preventing damage to your gutters. It also increases your ladder’s standoff distance, allowing for a safer and more comfortable working position.


View on Amazon

6. AgiiMan Gutter Cleaning Tool Pressure Washer

The AgiiMan Gutter Cleaning Tool Pressure Washer is a powerful and efficient solution for those who own a pressure washer. This tool features a flexible wand and an angled nozzle, allowing you to clean gutters up to 13 feet high with ease. The durable construction and corrosion-resistant materials ensure long-lasting performance.


View on Amazon

7. Buyplus Gutter Cleaning Wand

Buyplus 4-to-11 feet extendable gutter cleaning tool is multifunctional and practical. With a whole range of water flow, the rain gutter cleaning tool is not just for roof gutters but also ideal for cleaning soffits, removing leaf, mold, watering plants and more.The durable construction and easy-to-use design make this gutter cleaner a popular choice among homeowners.


View on Amazon

8. Gutter Sense Gutter Cleaning Tool

The Gutter Sense Gutter Cleaning Tool is another fantastic option for those looking to clean their gutters from the ground. This innovative tool features a pair of tongs attached to a rope and pole system, allowing you to grab and remove debris from your gutters without the need for a ladder. The lightweight design ensures easy use, while the 17-foot reach accommodates most homes.


View on Amazon

9. Shop-Vac 9197000 2.5-Inch Gutter Cleaning Kit

The Shop-Vac 9197000 2.5-Inch Gutter Cleaning Kit is another excellent option for those who own a wet/dry vacuum. This kit includes a 120-degree elbow, a 2.5-inch diameter hose, and two extension wands, providing a reach of up to 10 feet. The angled design ensures efficient debris removal, while the durable components guarantee long-lasting performance.


View on Amazon

Enhance Your Gutter Cleaning Experience: Gutter Cleaners for Clogged Gutters

When it comes to cleaning gutters effectively, pressure washer attachments stand out as a powerful tool that can significantly ease the process. These attachments can be connected to your pressure washer, transforming it into an ideal gutter cleaning device. Among the most popular options is the pressure washer gutter cleaner attachment, specifically designed to blast away leaves, twigs, and debris with ease. With the aid of a pressure washer wand, you can reach further distances, ensuring that even the most difficult-to-reach areas of your gutters are cleaned thoroughly. This method is not only efficient but also helps in preventing damage to your gutters, which can be caused by accumulated debris.

For homeowners looking for a more budget-friendly option, a garden hose attachment could be the ideal solution. By attaching a specialized nozzle to your garden hose, you can create a powerful stream of water capable of dislodging debris and leaves from your gutters. Although it might not provide the same level of pressure as a pressure washer kit, it is a safe and effective method for regular gutter maintenance. Additionally, investing in gutter guards can be a wise decision to reduce the frequency of cleanings required. Gutter guards work by preventing leaves and larger debris from entering the gutter, thus minimizing the chances of clogs and ensuring a smoother water flow.

For those who prefer manual cleaning methods, tools like the gutter getter scoop and extension pole are indispensable. The gutter getter scoop allows you to easily remove leaves and debris, ensuring that your gutters are clean and functional. For higher gutters, an extension pole can be used to extend your reach, eliminating the need for a ladder in many cases. Alternatively, gutter vacuums are becoming increasingly popular, offering a mess-free way to clean your gutters. By sucking up the debris, these vacuums make the cleaning process quicker and more efficient, ensuring that your gutters remain in top condition.

Conclusion

Each of these innovative tools features a unique design that allows you to grab and remove leaves and other debris while maintaining your roof and gutters with ease. Gutter cleaning is an essential aspect of home maintenance, and having the right tools for the job can make the process much more manageable.

The top gutter cleaning tools listed in this article offer a variety of solutions for homeowners and professionals alike, ensuring that your gutters remain clean and functional all year round. By investing in these high-quality gutter cleaning tools, you’ll protect your home from water damage. Don’t let gutter cleaning be a headache; choose the right tools for the job, and keep your home in tip-top shape.

Each of these tools can further enhance your gutter cleaning experience and cater to specific needs or preferences. By investing in the right gutter cleaning tools and accessories, you can ensure efficient and thorough cleaning, keeping your home protected from potential water damage.


Unlocking the Secrets of HDMI Switchers: A Tech Enthusiast’s Guide

Introduction

HDMI switchers have become essential in home entertainment systems, allowing users to connect multiple devices to their TVs or monitors and easily switch between them. These devices are particularly useful for those with limited HDMI ports on their TVs or who want to reduce cable clutter. In this article, we will explore the benefits of HDMI switchers, how to choose the right one for your needs, the difference between switchers and splitters, how to connect and set up a switcher, troubleshooting common problems, advanced features of HDMI switchers, predictions for the future of these devices, and reviews of top-rated HDMI switchers on the market.

HDMI switchers connect multiple HDMI devices, such as gaming consoles, Blu-ray players, streaming devices, and cable boxes, to a single HDMI input on a TV or monitor. The switcher acts as a hub, allowing users to easily switch between devices without physically disconnecting and reconnecting cables. With an HDMI switcher, users can simply press a button or use a remote control to switch between devices.

Benefits of HDMI Switchers for Home Entertainment Systems

One of the main benefits of using an HDMI switcher is its convenience. Instead of constantly plugging and unplugging cables when switching between devices, users can simply press a button or use a remote control to switch inputs. This saves time and eliminates the hassle of dealing with tangled cables. Additionally, some HDMI switchers offer automatic switching, which means they can detect when a device is turned on and automatically switch to that input.

Another advantage of using an HDMI switcher is that it helps reduce cable clutter and improves cable management. Instead of having multiple HDMI cables running from each device to the TV or monitor, users only need one cable from the switcher to the display. This not only makes the setup cleaner and more organized but also makes it easier to manage and troubleshoot any issues.

Furthermore, HDMI switchers can improve your home entertainment system’s picture and sound quality. Most modern HDMI switchers, such as 4K Ultra HD and Dolby Atmos, support high-definition video and audio formats. This means that users can enjoy a crisp and clear picture and immersive surround sound when watching movies, playing games, or streaming content. Some HDMI switchers even offer advanced features like HDR (High Dynamic Range) support, enhancing the contrast and color accuracy of the displayed content.

Choosing the Right HDMI Switcher: Factors to Consider

Consider the following factors when choosing an HDMI switcher for your home entertainment system. First, you must determine the inputs and outputs you require. Think about how many devices you want to connect to the switcher and how many displays you want to connect to the switcher. For example, if you have three devices (e.g., gaming console, Blu-ray player, streaming device) and one TV, you will need a switcher with at least three inputs and one output.

Compatibility with your devices is another important factor to consider. Ensure that your HDMI switcher is compatible with the devices you want to connect. Check the specifications of both the switcher and your devices to ensure they support the same video and audio formats. Additionally, consider any specific features or functionalities you may need, such as 4K compatibility or support for HDR.

Budget is also a crucial factor when choosing an HDMI switcher. Prices can vary significantly depending on the switcher’s brand, features, and quality. Set a budget for yourself and look for options within that range. Remember that while it’s important to find a switcher that fits your budget, it’s also important to prioritize quality and reliability. Cheaper switchers may not offer the same level of performance or durability as more expensive ones.

HDMI Switcher vs. HDMI Splitter: What’s the Difference?

While HDMI switchers and HDMI splitters may sound similar, they serve different purposes. An HDMI switcher allows you to connect multiple devices to a single display and switch between them. In contrast, an HDMI splitter allows you to connect a single device to multiple displays and duplicate the content. In other words, a switcher allows you to choose which device’s content is displayed on the TV or monitor, while a splitter duplicates the content from one device onto multiple screens.

Consider your specific needs when deciding whether to use a switcher or a splitter. If you have multiple devices that you want to connect to a single display and switch between them, an HDMI switcher is the right choice. On the other hand, if you have one device that you want to display on multiple screens simultaneously, an HDMI splitter is what you need. For example, if you want to watch a movie on two TVs in different rooms, you would use an HDMI splitter to duplicate the content from your Blu-ray player onto both TVs.

How to Connect and Set Up Your HDMI Switcher

Connecting and setting up an HDMI switcher is relatively straightforward. Here is a step-by-step guide to help you get started:

1. Gather all the necessary equipment: HDMI switcher, HDMI cables, devices (e.g., gaming console, Blu-ray player), TV, or monitor.

2. Identify the input and output ports on the HDMI switcher. The input ports are where you will connect your devices, and the output port is where you will connect your TV or monitor.

3. Connect one end of an HDMI cable to the output port of the switcher and the other end to an available HDMI input on your TV or monitor.

4. Connect an HDMI cable from each device you want to connect to the switcher to the input ports on the switcher. Make sure to match the correct input on the switcher with the corresponding device.

5. Power on all the devices, including the switcher, TV or monitor, and connected devices.

6. Use the remote control or buttons on the switcher to select the desired input. The content from that device should now be displayed on your TV or monitor.

7. If your switcher has automatic switching capabilities, enable this feature in the settings menu. This will allow the switcher to automatically switch to the active device when turned on.

Troubleshooting Common HDMI Switcher Problems

While HDMI switchers are generally reliable and easy to use, sometimes you still encounter issues. Here are some common problems and their solutions:

1. No signal: If you’re not getting a signal on your TV or monitor, check all cables are securely connected and that the correct input is selected on both the switcher and the TV or monitor. Also, make sure all devices are powered on.

2. Poor picture or sound quality: If you’re experiencing issues with picture or sound quality, check all cables are high-speed HDMI cables that support the necessary video and audio formats. Additionally, ensure your devices are set to output at their highest resolution and that your TV or monitor can display that resolution.

3. Switching delays: If there is a delay when switching between devices, it could be due to a slow response time of the switcher or a compatibility issue with one of your devices. Try disconnecting and reconnecting all cables, power cycling all devices, and updating firmware if available.

If you have tried troubleshooting common problems and are still experiencing issues with your HDMI switcher, it may be time to seek professional help. Contact the manufacturer’s customer support or consult a technician specializing in audiovisual equipment.

Advanced Features of HDMI Switchers: 4K Compatibility, Remote Control, and More

Many HDMI switchers offer advanced features that enhance the user experience. One of the most sought-after features is 4K compatibility. With the increasing popularity of 4K Ultra HD content, it’s important to ensure that your switcher can handle this high-resolution format. Look for a switcher that supports 4K at 60Hz and HDR for the best picture quality.

Remote control functionality is another useful feature to consider. Having a remote control allows you to switch between devices from the comfort of your couch without getting up and manually pressing buttons on the switcher. Some switchers even offer programmable remotes, allowing you to customize the buttons and assign specific inputs to them.

Another advanced feature to look for is automatic switching. This function eliminates manual input selection and provides a seamless user experience. Automatic switching can be particularly useful if you have devices frequently turned on and off, such as gaming consoles or streaming devices.

Future of HDMI Switchers: What to Expect in the Coming Years

As technology advances, we can expect HDMI switchers to evolve as well. One area of development is increased compatibility with emerging video and audio formats. With the rise of technologies like 8K resolution and immersive audio formats like Dolby Atmos, HDMI switchers must support these formats to provide users with the best possible experience.

Another area of improvement is the integration of wireless connectivity. While HDMI cables are currently the standard for transmitting high-definition video and audio signals, wireless technologies like Wi-Fi 6 and Bluetooth are becoming more prevalent. In the future, we may see HDMI switchers offer wireless connectivity options, allowing users to connect their devices without needing physical cables.

Additionally, we can expect HDMI switchers to become more compact and streamlined. As technology advances, manufacturers will find ways to pack more features and functionality into smaller form factors. This will make switchers more aesthetically pleasing and more convenient to use and transport.

Top HDMI Switchers on the Market: Reviews and Recommendations

Many HDMI switchers are available on the market, each with its own features and price points. Here are some top-rated HDMI switchers that are highly recommended:

1. J-Tech Digital JTD4KSP0301 4K HDMI Switcher: This switcher supports 4K at 60Hz and HDR, making it ideal for those who want the best picture quality. It has three inputs and one output, allowing you to connect multiple devices to your TV or monitor. The JTD4KSP0301 also comes with a remote control for easy input selection.

2. Fosmon HD1832 Intelligent 5-Port HDMI Switcher: This switcher offers five inputs and one output, making it perfect for those with multiple devices. It supports 1080p resolution and comes with a remote control for convenient switching. The HD1832 also has automatic switching capabilities, allowing it to detect a turned-on device and switch to that input.

3. Kinivo 501BN 5-Port High-Speed HDMI Switch: This switcher supports 1080p resolution and has five inputs and one output. It features a remote control for easy input selection and automatic switching capabilities. The 501BN also has a built-in signal amplifier, ensuring you get the best picture and sound quality.

Conclusion: Enhancing Your Home Entertainment Experience with an HDMI Switcher

In conclusion, HDMI switchers are valuable to any home entertainment system. They offer convenience, reduced cable clutter, and improved picture and sound quality. When choosing an HDMI switcher, consider the number of inputs and outputs you need, compatibility with your devices, and your budget. Remember that HDMI switchers differ from HDMI splitters, so choose the right device for your needs. When connecting and setting up your switcher, follow the step-by-step guide and troubleshoot common problems if necessary. Look for switchers with advanced features like 4K compatibility, remote control functionality, and automatic switching. Finally, consider top-rated HDMI switchers and read reviews to find the best one for your home entertainment system. With an HDMI switcher, you can enhance your home entertainment experience and enjoy seamless switching between devices.

Don’t Get Screwed Over: Essential Safety Measures for Working with Screws

Understanding the Importance of Safety Measures for Working with Screws

Working with screws is a common task in many industries and DIY projects. Whether you are a professional tradesperson or a hobbyist, it is important to understand the safety measures associated with working with screws. This article will provide a comprehensive guide to working with screws, including the different types of screws, common hazards, personal protective equipment (PPE), proper handling and storage, choosing the right screwdriver, pre-drilling and pilot holes, understanding torque and tension, and troubleshooting common screw-related problems.

Types of Screws and Their Uses: A Brief Overview

Screws come in various types and sizes, each designed for specific applications. Some common types of screws include wood screws, machine screws, sheet metal screws, and self-tapping screws. Wood screws are designed for use in wood and have a sharp point and coarse threads. Machine screws are used in metal applications and have a blunt end and fine threads. Sheet metal screws are used to fasten metal sheets together and have sharp threads that cut into the material. Self-tapping screws have a drill-like point and are used to create their own threads in materials such as plastic or metal.

Using the right screw for the job is crucial for ensuring a secure and long-lasting connection. Using the wrong type of screw can result in weak joints, stripped threads, or even damage to the material being fastened. It is important to consider factors such as the material being fastened, the load-bearing capacity required, and the environment in which the screw will be used. By selecting the appropriate screw for the task at hand, you can ensure a strong and reliable connection.

Common Hazards Associated with Working with Screws

Working with screws can pose certain hazards if proper safety measures are not followed. Some common hazards include:

  1. Hand Injuries: When handling screws, there is a risk of getting your hand caught between the screw and the material being fastened. This can result in cuts, punctures, or even amputations.
  2. Eye Injuries: When driving screws, there is a risk of flying debris or the screw itself hitting your eyes. This can cause serious eye injuries, including corneal abrasions or even blindness.
  3. Slips and Falls: If screws are not properly stored or organized, they can create tripping hazards. Slipping or falling on screws can result in injuries such as sprains, fractures, or head injuries.

It is important to be aware of these potential hazards and take appropriate safety measures to prevent accidents and injuries.

Personal Protective Equipment (PPE) for Working with Screws

To protect yourself from the hazards associated with working with screws, it is important to use personal protective equipment (PPE). Some common types of PPE for working with screws include:

  1. Safety Glasses: Safety glasses or goggles should be worn to protect your eyes from flying debris or the screw itself. They should have side shields to provide maximum protection.
  2. Gloves: Gloves should be worn to protect your hands from cuts, punctures, or amputations. Choose gloves that are resistant to sharp objects and provide a good grip.
  3. Steel-toed Boots: Steel-toed boots should be worn to protect your feet from falling screws or other heavy objects. They should have slip-resistant soles to prevent slips and falls.
  4. Ear Protection: If you are using power tools to drive screws, it is important to wear ear protection to prevent hearing damage from the noise generated by the tools.

Using PPE is essential for preventing injuries and ensuring your safety while working with screws. Make sure to wear the appropriate PPE for the task at hand and replace any damaged or worn-out equipment.

Proper Handling and Storage of Screws: Tips and Tricks

Proper handling and storage of screws is important for several reasons. Firstly, it helps prevent injuries by reducing the risk of slips, falls, or getting your hand caught between screws. Secondly, it ensures that screws are in good condition and ready for use when needed. Here are some tips for proper handling and storage of screws:

  1. Use Screw Trays or Organizers: Invest in screw trays or organizers to keep your screws organized and easily accessible. Sort screws by size, type, or application to make it easier to find the right screw when needed.
  2. Handle Screws with Care: When handling screws, be careful not to drop them or let them roll off the work surface. Dropping screws can damage the threads or cause them to become misaligned, making them difficult to use.
  3. Store Screws in a Dry Environment: Moisture can cause screws to rust or corrode, making them unusable. Store screws in a dry environment, such as a toolbox or airtight containers, to prevent moisture damage.
  4. Label Screw Containers: If you have multiple containers or trays for different types of screws, label them to avoid confusion. This will make it easier to find the right screw when needed and prevent using the wrong screw for the job.

By following these tips, you can ensure that your screws are well-organized, in good condition, and ready for use whenever you need them.

Choosing the Right Screwdriver: Factors to Consider

Using the right screwdriver is essential for properly driving screws and preventing damage to the screw or the material being fastened. When choosing a screwdriver, consider the following factors:

  1. Screw Type and Size: Different types of screws require different types of screwdrivers. Make sure to choose a screwdriver that matches the screw type and size you are working with.
  2. Screwdriver Tip: The tip of the screwdriver should fit snugly into the screw head to prevent slipping or stripping. Common screwdriver tips include flathead, Phillips, and Torx.
  3. Handle Comfort: Choose a screwdriver with a comfortable handle that provides a good grip. This will make it easier to apply the necessary torque without straining your hand or wrist.
  4. Quality and Durability: Invest in high-quality screwdrivers that are made from durable materials. Cheap or low-quality screwdrivers can easily break or wear out, making them ineffective for driving screws.

Using the right screwdriver for the job will ensure that screws are properly driven and securely fastened. It will also prevent damage to the screw or the material being fastened, resulting in a stronger and more reliable connection.

Pre-Drilling and Pilot Holes: Why They Matter

Pre-drilling and creating pilot holes are important steps when working with screws, especially in certain materials such as wood or metal. Pre-drilling involves drilling a hole slightly smaller than the diameter of the screw, while pilot holes are small holes drilled into the material to guide the screw. Here’s why pre-drilling and pilot holes matter:

  1. Prevents Splitting: Pre-drilling helps prevent wood from splitting when driving screws near the edge or end grain. Without pre-drilling, the wood can crack or split, compromising the strength of the joint.
  2. Eases Screw Insertion: Pilot holes make it easier to insert screws into the material by providing a guide for the screw. This is especially important when working with hardwoods or dense materials that can be difficult to drive screws into.
  3. Reduces Risk of Stripped Threads: Pre-drilling and pilot holes reduce the risk of stripping the threads on the screw or in the material being fastened. This ensures a secure and tight connection that will not loosen over time.

To properly pre-drill and create pilot holes, choose a drill bit that is slightly smaller than the diameter of the screw. Drill the hole to the appropriate depth, making sure not to drill too deep or too shallow. Use a countersink bit to create a recess for the screw head if necessary. Finally, insert the screw into the hole and drive it in using the appropriate screwdriver.

Torque and Tension: Understanding the Mechanics of Screws

Understanding torque and tension is important when working with screws, as it determines the strength and reliability of the connection. Torque refers to the rotational force applied to the screw, while tension refers to the stretching force exerted on the screw. Here’s why understanding torque and tension matters:

  1. Proper Tightening: Applying the correct amount of torque ensures that the screw is properly tightened and securely fastened. Under-tightening can result in a weak joint that may loosen over time, while over-tightening can strip the threads or damage the material being fastened.
  2. Avoiding Damage: Applying excessive torque can cause the screw to break or strip, especially in softer materials such as wood or plastic. Understanding the appropriate torque for the screw and material being fastened will help prevent damage.
  3. Load-Bearing Capacity: The tension in a screw determines its load-bearing capacity. Understanding the tension required for a specific application will ensure that the screw can withstand the expected load without failing.

To properly apply torque and tension to screws, use a torque wrench or a screwdriver with a built-in torque control mechanism. Follow the manufacturer’s recommendations for the appropriate torque settings for the screw and material being fastened. Avoid using excessive force or power tools, as this can easily strip the threads or damage the material.

Working with screws can sometimes lead to common problems that need to be addressed. Here are some common screw-related problems and how to troubleshoot them:

  1. Stripped Threads: If the threads on the screw or in the material become stripped, the screw will not be able to create a secure connection. To fix this problem, you can try using a larger screw or filling the stripped hole with a wooden dowel or epoxy and then re-drilling the hole.
  2. Loose Screws: If screws become loose over time, they can compromise the strength and stability of the joint. To fix this problem, you can try applying a thread-locking adhesive or using a larger screw that provides a tighter fit.
  3. Difficult Screw Removal: If a screw becomes stuck or difficult to remove, you can try using penetrating oil to loosen it. Apply the oil to the screw and let it sit for a few minutes before attempting to remove it with a screwdriver or a power tool.
  4. Damaged Screw Heads: If the screw head becomes damaged or stripped, it can be difficult to drive or remove the screw. To fix this problem, you can try using a screw extractor tool or cutting a new slot in the screw head with a rotary tool.

By troubleshooting these common problems, you can ensure that your screws are properly installed and functioning as intended.

Conclusion: Staying Safe and Productive While Working with Screws

Working with screws is a common task in many industries and DIY projects. By understanding the importance of safety measures, using the right screw for the job, being aware of potential hazards, using personal protective equipment, properly handling and storing screws, choosing the right screwdriver, pre-drilling and creating pilot holes, understanding torque and tension, and troubleshooting common screw-related problems, you can stay safe and productive while working with screws. Remember to always prioritize safety and follow best practices to ensure a successful outcome in your projects.

NEC Cable Ratings for Plenum: The Key to Safe and Efficient Wiring

Introduction

NEC cable ratings for plenum play a crucial role in ensuring building safety. Plenum refers to the space above a drop ceiling or below a raised floor used for air circulation in buildings. It is crucial to understand and adhere to NEC cable ratings for plenum to prevent potential hazards and ensure the safety of occupants.

Understanding NEC Cable Ratings for Plenum: An Introduction

NEC cable ratings for plenum refer to the specifications and requirements that cables must meet to be used in plenum spaces. These ratings are determined by the National Fire Protection Association (NFPA), a U.S.-based international nonprofit organization devoted to eliminating death, injury, property, and economic loss due to fire, electrical, and related hazards.

The NEC cable ratings for plenum are determined based on various factors such as fire resistance, smoke generation, and toxicity. Cables rated for plenum spaces are designed to have low smoke and flame-spread characteristics, which help prevent the spread of fire and smoke in the event of a fire.

It is important to understand NEC cable ratings for plenum because using cables that do not meet these requirements can pose serious risks to building occupants. Non-compliant cables can contribute to the spread of fire and smoke, leading to injuries or fatalities. Therefore, it is crucial to use cables specifically rated for plenum spaces.

The Importance of NEC Cable Ratings for Plenum in Building Safety

NEC cable ratings for plenum are essential for building safety as they help prevent potential hazards. Plenum spaces are often used for air circulation, meaning any cables installed in these areas can come into contact with air handling systems. If non-compliant cables are used, they can release toxic fumes or contribute to the spread of fire and smoke, putting occupants at risk.

For example, if a fire were to break out in a building with non-compliant cables installed in the plenum space, the cables could release toxic fumes that can be harmful or even fatal to occupants. Additionally, suppose the cables do not have low smoke and flame spread characteristics. In that case, they can contribute to the rapid spread of fire and smoke throughout the building, making it difficult for occupants to escape.

By adhering to NEC cable ratings for plenum, building owners and professionals can ensure that the cables used in plenum spaces are safe and will not pose a risk to occupants in the event of a fire. The adhesion to NEC cable ratings for plenum is crucial for maintaining building safety and protecting the lives of those inside.

Types of NEC Cable Ratings for Plenum: A Comprehensive Guide

There are different types of NEC cable ratings for plenum, each with its specifications and requirements. It is important to understand the differences between these types in order to select the appropriate cables for plenum spaces.

One type of NEC cable rating for plenum is CMP (Communications Plenum). CMP cables are designed for use in plenum spaces and have low smoke and flame spread characteristics. They are commonly used for communication and data transmission applications.

Another type of NEC cable rating for plenum is CL2P (Class 2 Plenum). CL2P cables are also designed for use in plenum spaces but have different specifications compared to CMP cables. They are typically used for low-voltage applications such as audio and video systems.

There is also the CL3P (Class 3 Plenum) rating, which is similar to CL2P but has higher voltage capabilities. CL3P cables are commonly used for applications such as speaker systems and intercoms.

It is important to select the appropriate NEC cable rating for the plenum based on the specific requirements of the installation. Using the wrong cable type can compromise building safety and does not meet code requirements.

Factors Affecting NEC Cable Ratings for Plenum: What You Need to Know

Several factors can affect NEC cable ratings for plenum, and it is important to be aware of these factors when selecting cables for plenum spaces. Some key factors impacting NEC cable ratings for plenum include fire resistance, smoke generation, and toxicity.

Fire resistance is a critical factor to consider when selecting cables for plenum spaces. Cables with low fire resistance can contribute to spreading fire and pose a significant risk to building occupants.

Smoke generation is another important factor to consider. In a fire, cables that generate excessive smoke can hinder evacuation and make it difficult for occupants to escape. Low smoke generation is crucial for maintaining visibility and ensuring the safety of building occupants.

Toxicity is also a key consideration when selecting cables for plenum spaces. Non-compliant cables can release toxic fumes when exposed to fire, which can be harmful or even fatal to occupants. Cables with low toxicity are essential for protecting the health and well-being of those inside the building.

By considering these factors and selecting cables that meet the appropriate NEC cable ratings for plenum, building owners and professionals can ensure that the cables used in plenum spaces are safe and will not pose a risk to occupants in the event of a fire.

The Benefits of Using NEC Cable Ratings for Plenum in Wiring Installations

Using NEC cable ratings for plenum in wiring installations offers several benefits, including enhanced building safety and efficiency. Building owners and professionals can ensure that the wiring installations are safe and compliant with code requirements by using cables that meet the appropriate NEC cable ratings for the plenum.

One of the key benefits of using NEC cable ratings for plenum is improved fire safety. Cables that meet the appropriate ratings have low flame spread characteristics, which helps prevent the spread of fire in the event of a fire. NEC cable ratings for plenum can significantly reduce the risk of injuries or fatalities and minimize property damage.

Another benefit is improved smoke management. Cables that meet the appropriate ratings have low smoke generation characteristics, which means they produce less smoke in the event of a fire. The improved smoke management can help maintain visibility and make it easier for occupants to evacuate the building.

Using NEC cable ratings for plenum also contributes to overall building efficiency. By using cables specifically designed for plenum spaces, professionals can ensure that the wiring installations are optimized for air circulation and do not hinder the performance of HVAC systems. This can help improve energy efficiency and reduce operating costs.

By adhering to these ratings, professionals can ensure that the wiring installations are safe, compliant with code requirements, and optimized for performance.

How to Choose the Right NEC Cable Ratings for Plenum for Your Building

Choosing the right NEC cable ratings for the plenum for your building requires careful consideration of various factors. It is important to select cables that meet the specific requirements of your installation to ensure building safety and compliance with code requirements.

One of the first factors to consider is the type of application. Different applications may have different requirements in terms of voltage capabilities, data transmission speeds, and signal quality. It is important to select cables specifically designed for your application to ensure optimal performance.

Another factor to consider is the specific requirements of your plenum space. Plenum spaces can vary in size, ventilation, and air circulation. It is important to select cables suitable for your specific plenum space to ensure proper installation and performance.

Additionally, it is important to consider any additional requirements or regulations that may apply to your installation. Some jurisdictions may have specific requirements or regulations regarding NEC cable ratings for plenum. It is important to be aware of these requirements and ensure compliance to avoid potential penalties or legal issues.

By considering these factors and selecting cables that meet the appropriate NEC cable ratings for plenum, you can ensure that your wiring installation is safe, compliant with code requirements, and optimized for performance.

NEC Cable Ratings for Plenum vs. Non-Plenum: What’s the Difference?

The main difference between NEC cable ratings for plenum and non-plenum is the level of fire resistance, smoke generation, and toxicity. Cables rated for plenum spaces are designed to have low smoke and flame spread characteristics, which helps prevent the spread of fire and smoke in the event of a fire.

On the other hand, non-plenum cables do not have the same level of fire resistance, smoke generation, and toxicity characteristics. These cables are unsuitable for use in plenum spaces as they can contribute to spreading fire and smoke, posing a risk to building occupants.

It is important to use cables specifically rated for plenum spaces rather than non-plenum cables to ensure building safety and compliance with code requirements.

Common Myths and Misconceptions about NEC Cable Ratings for Plenum

There are several common myths and misconceptions surrounding NEC cable ratings for the plenum. It is important to debunk these myths to ensure accurate understanding and compliance with code requirements.

One common myth is that any cable can be used in plenum spaces if installed in conduit, which is untrue. Even if a cable is installed in conduit, it must still meet the appropriate NEC cable ratings for plenum to be used in plenum spaces. 

Another myth is that using non-plenum cables in plenum spaces is a cost-effective alternative. While non-plenum cables may be less expensive than plenum-rated cables, using them in plenum spaces can pose serious risks to building occupants. The potential consequences of using non-compliant cables, such as the spread of fire and smoke, far outweigh any cost savings.

It is important to ensure accurate understanding and compliance with NEC cable ratings for plenum to maintain building safety and protect the lives of those inside.

Compliance with NEC Cable Ratings for Plenum: Best Practices for Professionals

To ensure building safety and compliance with code requirements, compliance with NEC cable ratings for plenum is essential for professionals. Professionals can follow several best practices to ensure compliance with NEC cable ratings for the plenum.

One best practice is to stay up-to-date with the latest NEC code requirements. The NEC is regularly updated to reflect advancements in technology and changes in industry standards. It is important for professionals to stay informed about these updates and ensure that their installations comply with the latest code requirements.

Another best practice is to work with reputable suppliers and manufacturers. It is important to source cables from trusted suppliers and manufacturers who can provide documentation and certifications verifying compliance with plenum’s NEC cable ratings. This can help ensure that the cables used in installations are safe and compliant with code requirements.

Additionally, it is important to conduct regular inspections and maintenance of wiring installations. Regular inspections can help identify any potential issues or non-compliant cables that need to be replaced. Maintenance activities such as cleaning and testing can also help ensure the ongoing performance and safety of the wiring installations.

By following these best practices, professionals can ensure compliance with NEC cable ratings for plenum and maintain building safety.

The future of NEC cable ratings for plenum is likely to see advancements in technology and innovations that further enhance building safety and efficiency. One potential trend to watch out for is the development of new materials and manufacturing processes that improve the fire resistance, smoke generation, and toxicity characteristics of cables.

Advancements in technology may also lead to the development of new types of cables specifically designed for plenum spaces. These cables may have enhanced performance characteristics and improved installation flexibility, making them easier to work with and more efficient.

Another potential trend is the integration of smart technology into NEC cable ratings for the plenum. Smart cables may have built-in sensors and monitoring capabilities to detect potential issues or failures in real-time, allowing for proactive maintenance and troubleshooting.

Overall, the future of NEC cable ratings for plenum is likely to see advancements in technology and innovations that further enhance building safety and efficiency. It is important for professionals to stay informed about these developments and ensure compliance with the latest code requirements.

Conclusion

NEC cable ratings for plenum play a crucial role in ensuring building safety. Using cables that do not meet NEC cable ratings for plenum can pose serious risks to building occupants, including the spread of fire, smoke, and toxic fumes.

It is important to understand and adhere to NEC cable ratings for plenum to prevent potential hazards and ensure the safety of occupants. By selecting cables that meet the appropriate NEC cable ratings for plenum, professionals can ensure that their wiring installations are safe, compliant with code requirements, and optimized for performance.

Compliance with NEC cable ratings for plenum should be a top priority for professionals to maintain building safety and protect the lives of those inside. By following best practices, staying informed about code requirements, and working with reputable suppliers and manufacturers, professionals can ensure compliance with NEC cable ratings for plenum and the overall safety and efficiency of buildings.

Mastering the Art of Ratchet Straps: A Step-by-Step Guide to Safe Transport

Introduction

Ratchet straps are an essential tool for safe transport, whether you’re moving furniture, securing equipment on a trailer, or transporting goods in a truck. These straps provide a reliable and secure way to hold down cargo, preventing it from shifting or falling during transit. Mastering the art of using ratchet straps is crucial for ensuring the safety of your cargo and the well-being of those on the road.

Understanding the Basics of Ratchet Straps

Ratchet straps, also known as tie-down straps or lashing straps, are made up of a few key components. The strap itself is typically made of durable polyester webbing, which has high tensile strength and resistance to abrasion. The ratchet mechanism is what allows you to tighten and secure the strap, and it consists of a handle, a spool, and a release lever. The hooks or end fittings at each end of the strap are used to anchor the strap to the cargo and the anchor point.

There are different types of ratchet straps available, each designed for specific purposes. The most common types include cam buckle straps, over-center buckle straps, and ratchet buckle straps. Cam buckle straps are easy to use and ideal for lighter loads, while over-center buckle straps provide a secure hold for heavier loads. Ratchet buckle straps offer the highest level of tensioning and are suitable for heavy-duty applications.

Choosing the Right Ratchet Strap for Your Needs

When choosing ratchet straps, there are several factors to consider. First and foremost, you need to determine the type of cargo you will be securing. Different types of cargo require different types of ratchet straps. For example, if you’re transporting motorcycles or ATVs, you may need specialized straps with built-in soft loops to protect the handlebars.

Weight capacity is another important consideration. Ratchet straps come in various weight capacities, ranging from a few hundred pounds to several thousand pounds. It’s crucial to choose a strap with a weight capacity that exceeds the weight of your cargo. Additionally, you need to consider the length of the strap. Make sure it is long enough to reach from the cargo to the anchor point with some extra length for tensioning.

Inspecting Your Ratchet Straps for Safety

Before using ratchet straps, it’s essential to inspect them for any signs of wear and tear. Regular inspections can help identify potential issues that could compromise the safety of your cargo. Look for frayed or damaged webbing, broken stitches, or any other signs of damage. Check the ratchet mechanism to ensure it is functioning properly and inspect the hooks or end fittings for any signs of corrosion or deformation.

If you notice any signs of wear or damage, it’s crucial to replace the ratchet straps immediately. Using damaged straps can lead to catastrophic failures and accidents on the road. Regularly inspecting and replacing ratchet straps when necessary is a simple yet effective way to ensure the safety of your cargo.

Properly Securing Your Cargo with Ratchet Straps

Securing your cargo properly with ratchet straps is essential for safe transport. Follow these steps to ensure a secure hold:

1. Start by anchoring one end of the strap to a secure point on the vehicle or trailer.

2. Thread the loose end of the strap through or around the cargo, making sure it is positioned securely.

3. Attach the hook or end fitting to the anchor point on the other side of the cargo.

4. Begin tightening the strap by operating the ratchet mechanism. Use the handle to crank the spool and tighten the strap.

5. Continue tightening until the strap is securely tensioned and there is no slack.

6. Lock the ratchet mechanism in place by engaging the release lever.

It’s important to evenly distribute the weight of the cargo across multiple straps if necessary. This helps prevent excessive stress on a single strap and ensures a more secure hold. Additionally, when securing irregularly shaped cargo, consider using additional padding or soft loops to protect both the cargo and the strap from damage.

Tips for Tensioning Ratchet Straps

Proper tensioning is crucial for the effectiveness of ratchet straps. Over-tensioning can cause damage to the strap or the cargo, while under-tensioning can result in a loose hold that may lead to shifting or falling cargo. Follow these tips for achieving optimal tension:

1. Start by tightening the strap by hand before engaging the ratchet mechanism. This helps remove any slack and ensures a more secure hold.

2. Use the ratchet mechanism to further tighten the strap, making sure to apply even pressure on both sides.

3. Avoid over-tightening the strap, as this can cause excessive stress on the strap and potentially damage the cargo.

4. Check the tension periodically during transit to ensure that the strap remains securely tightened.

Avoiding Common Mistakes When Using Ratchet Straps

There are several common mistakes that people make when using ratchet straps, which can compromise the safety of their cargo. Some of these mistakes include:

1. Using damaged or worn-out straps: As mentioned earlier, it’s crucial to inspect your ratchet straps before each use and replace them if necessary.

2. Overloading the straps: Exceeding the weight capacity of the straps can lead to failure and accidents. Always choose straps with a weight capacity that exceeds the weight of your cargo.

3. Improperly securing the cargo: Failing to properly thread the strap through or around the cargo can result in a loose hold. Take the time to ensure that the strap is positioned securely.

4. Insufficient tensioning: Under-tensioning the straps can result in a loose hold, while over-tensioning can cause damage. Follow the proper tensioning techniques mentioned earlier.

5. Using the wrong type of strap: Different types of cargo require different types of ratchet straps. Make sure you choose the right strap for your specific needs.

Storing Ratchet Straps for Longevity

Proper storage of ratchet straps is essential for their longevity and performance. Here are some tips for storing your straps:

1. Clean and dry the straps before storing them to prevent the growth of mold or mildew.

2. Avoid storing the straps in direct sunlight or extreme temperatures, as this can cause damage to the webbing.

3. Coil the straps neatly and secure them with a rubber band or Velcro strap to prevent tangling.

4. Store the straps in a dry and well-ventilated area, away from any chemicals or corrosive substances.

By following these storage techniques, you can extend the lifespan of your ratchet straps and ensure that they are always ready for use.

Maintaining Ratchet Straps for Optimal Performance

Regular maintenance is crucial for keeping your ratchet straps in optimal condition. Here are some maintenance tips to follow:

1. Clean the straps regularly using mild soap and water to remove any dirt or debris.

2. Inspect the straps for any signs of damage, such as frayed webbing or broken stitches.

3. Lubricate the ratchet mechanism periodically to ensure smooth operation.

4. Store the straps properly when not in use, as mentioned earlier.

By incorporating these maintenance practices into your routine, you can prolong the life of your ratchet straps and ensure their optimal performance.

Using Ratchet Straps in Extreme Weather Conditions

Using ratchet straps in extreme weather conditions can present unique challenges. Here are some tips to keep in mind:

1. In cold weather, be aware that the webbing may become stiffer and less pliable. Take extra care when tensioning the straps to avoid damage.

2. In hot weather, the webbing may become more susceptible to stretching. Check the tension periodically during transit and re-tighten if necessary.

3. In wet weather, make sure to dry the straps thoroughly before storing them to prevent the growth of mold or mildew.

4. After extreme weather conditions, such as heavy rain or strong winds, check the straps for any signs of damage and replace them if necessary.

When using ratchet straps on public roads, it’s important to comply with legal requirements to ensure the safety of yourself and others. The specific requirements may vary depending on your location, but some common regulations include:

1. Using straps with a sufficient weight capacity for your cargo.

2. Ensuring that the straps are in good condition and free from any signs of wear or damage.

3. Properly securing the cargo and ensuring that it does not pose a hazard to other road users.

4. Following any specific regulations regarding the use of ratchet straps, such as the number of straps required for a particular type of cargo.

Non-compliance with these legal requirements can result in fines, penalties, or even legal liability in the event of an accident. It’s crucial to familiarize yourself with the regulations in your area and ensure that you are in full compliance.

Conclusion

Mastering the art of ratchet straps is essential for safe transport and peace of mind. By understanding the basics of ratchet straps, choosing the right strap for your needs, inspecting them for safety, properly securing your cargo, tensioning them correctly, avoiding common mistakes, storing and maintaining them properly, using them in extreme weather conditions, and complying with legal requirements, you can ensure the safety of your cargo and those on the road. Safe transport is not just about getting from point A to point B—it’s about protecting your cargo and the well-being of everyone involved. So take the time to master the art of ratchet straps and make safe transport a top priority.

From Panels to Power: The Future of Solar Energy Management and Recycling

Introduction: The Rise of Solar Energy and Its Growing Importance

Solar energy has been harnessed by humans for thousands of years. Dating back to the 7th century B.C. in ancient China, the earliest recorded use of solar energy, people used magnifying glasses to concentrate sunlight and start fires. However, it wasn’t until the 19th century that scientists began to understand the potential of solar energy as a renewable and sustainable power source.

Today, solar energy is experiencing a rapid rise in popularity and importance. With technological advancements and increasing concerns about climate change, solar energy has become a key player in the transition to a clean and sustainable future. According to the International Energy Agency (IEA), solar energy is the fastest-growing source of electricity globally, with an average annual growth rate of 30% over the past decade.

The growing importance of solar energy can be attributed to its numerous benefits. Solar energy is abundant, clean, and renewable, making it an attractive alternative to fossil fuels. It also reduces greenhouse gas emissions and helps combat climate change. As the world continues to grapple with the effects of global warming, solar energy is becoming an essential part of the solution.

The Need for Efficient Solar Energy Management and Recycling

While solar energy is undoubtedly a valuable resource, managing and efficiently recycling it is crucial. Efficient management ensures solar energy is utilized to its full potential, maximizing its benefits and minimizing waste. Recycling, on the other hand, allows for reusing materials from decommissioned solar panels, reducing environmental impact and promoting sustainability.

Inefficient solar energy management will have negative consequences. For instance, if solar panels are not properly positioned or maintained, they may not capture as much sunlight as they could, resulting in reduced energy production. This inefficiency wastes valuable resources and limits the potential for solar energy to replace fossil fuels.

Similarly, inadequate recycling practices will also lead to environmental harm. Solar panels contain various materials, including glass, aluminum, and silicon, which can be recycled and reused. However, if these materials are not properly managed at the end of a solar panel’s life cycle, they will end up in landfills, contributing to pollution and resource depletion.

The Role of Solar Panels in Energy Generation

Solar panels are the most common technology used to harness solar energy for electricity generation. They convert sunlight into direct current (D.C.) electricity through the photovoltaic effect. This process of generating electricity occurs when photons from the sun’s rays strike the solar panel’s surface, causing electrons in the panel’s semiconductor material to become excited and flow as an electric current.

Solar panels offer several benefits for energy generation. Firstly, They provide a clean and renewable source of electricity. Unlike fossil fuels, solar energy neither produces harmful emissions nor contributes to climate change. Solar panels can be installed on various surfaces, such as rooftops or open fields, making them versatile and adaptable to different environments. Solar panels have a long lifespan and require minimal maintenance, making them a cost-effective solution for energy generation.

The Importance of Proper Solar Panel Maintenance

Proper maintenance is crucial for ensuring the efficiency and longevity of solar panels. Neglecting maintenance will lead to reduced energy production and increased costs over time. Regular inspections and cleaning are essential to remove dirt, dust, and debris that accumulate on the surface of solar panels and hinder sunlight absorption.

Poor maintenance has a negative impact on solar panel efficiency. Dust and debris will block sunlight from reaching the panel’s surface, reducing its ability to generate electricity. Additionally, any damage or defects in the panels, such as cracks or loose connections, further decrease efficiency and potentially lead to system failure.

It is recommended to clean solar panels at least twice a year or more frequently in dusty or polluted areas to maintain optimal performance. Cleaning can be done using water and a soft brush or sponge, avoiding abrasive materials that scratch the panel’s surface. Regular inspections should also be conducted to identify any signs of damage or malfunction requiring professional repair.

The Future of Solar Energy Management: Smart Grids and Energy Storage

The future of solar energy management lies in the integration of smart grids and energy storage systems. Smart grids are advanced electrical grids that use digital technology to monitor and control electricity flow. They enable real-time communication between power producers, consumers, and grid operators, allowing for more efficient and reliable energy distribution.

Smart grids play a crucial role in solar energy management by optimizing the use of solar power. They can monitor the electricity demand and supply in real time, adjusting the distribution accordingly. This ensures excess solar energy can be stored or redirected to higher-demand areas.

Energy storage systems are another key component of solar energy management. They allow for storing excess solar energy generated during the day for use during periods of low sunlight or high demand. Energy storage technologies, such as batteries, enable a more reliable and consistent supply of electricity from solar sources, reducing the need for backup power from fossil fuel-based sources.

The Advancements in Solar Energy Recycling Technologies

As decommissioned solar panels increase, there is a growing need for effective recycling technologies. Currently, most solar panels end up in landfills, which take hundreds of years to decompose fully. However, advancements in recycling technologies are offering promising solutions to this issue.

One such advancement is the development of specialized recycling facilities that can efficiently separate and recover valuable materials from solar panels. These facilities use various techniques, such as mechanical shredding, thermal treatment, and chemical processes, to break down the panels into their constituent parts. The recovered materials can then be reused to manufacture new solar panels or other products.

Another promising development is using advanced recycling techniques, such as hydrometallurgical processes, to extract valuable metals from solar panels. These processes involve dissolving the panel’s components in a liquid solution and selectively recovering the desired metals. This method allows for a higher recovery rate of valuable materials and reduces the environmental impact of solar panel disposal.

The Economic Benefits of Solar Energy Management and Recycling

Efficient solar energy management and recycling offer considerable economic benefits. Firstly, by maximizing solar energy utilization, countries can reduce their dependence on imported fossil fuels, saving costs and increasing energy security. Solar energy is a domestic resource that can be harnessed locally, reducing the need for expensive fuel imports.

Additionally, the solar energy industry has the potential to create jobs and stimulate economic growth. According to a report by the International Renewable Energy Agency (IRENA), the renewable energy sector, including solar energy, employed over 11 million people worldwide in 2018. As the demand for solar energy continues to rise, so does the need for skilled workers in installation, maintenance, manufacturing, research and development.

Furthermore, recycling solar panels is beneficial to a circular economy, where materials are reused and recycled rather than discarded. This can create new business opportunities in the recycling industry and promote sustainable practices. By recovering valuable materials from decommissioned solar panels, companies can reduce their reliance on virgin resources and lower production costs.

The Environmental Benefits of Solar Energy Management and Recycling

Solar energy management and recycling have significant environmental benefits. Firstly, countries can reduce their greenhouse gas emissions and mitigate climate change by harnessing solar energy instead of fossil fuels. Solar energy is a clean source of electricity that does not produce carbon dioxide or other harmful pollutants during operation.

Secondly, proper management and recycling of solar panels help reduce waste and minimize environmental impact. Recycling materials from decommissioned panels allows valuable resources to be conserved and reused, reducing the need to extract and manufacture new materials. This reduces the carbon footprint of producing solar panels and promotes a more sustainable approach to energy generation.

Furthermore, solar energy management and recycling contribute to conserving natural resources. Solar panels contain various materials, such as silicon, aluminum, and glass, which require significant energy and resources. Recycling these materials reduces the demand for virgin resources, leading to less environmental degradation and resource depletion.

The Challenges and Opportunities in Solar Energy Management and Recycling

While solar energy management and recycling offer numerous benefits, some challenges must be addressed. One of the main challenges is the high initial cost of installing solar panels. Although the cost of solar panels has decreased significantly over the years, it remains a barrier for many individuals and businesses. However, with continued technological advancements and government incentives, the cost of solar energy is expected to become more affordable in the future.

Another challenge is the limited lifespan of solar panels. Most solar panels have a lifespan of around 25 to 30 years before they need to be replaced. Proper recycling practices are essential to ensure that decommissioned panels are properly managed and their materials are recovered for reuse. However, the infrastructure for solar panel recycling is still developing in many regions, posing a challenge to effective recycling.

Despite these challenges, there are also opportunities for innovation and growth in the solar energy industry. Continued investment in research and development can lead to advancements in solar panel efficiency, making them more cost-effective and accessible. Additionally, the development of new recycling technologies can create new business opportunities and promote a circular economy.

Conclusion: The Promising Future of Solar Energy Management and Recycling

Solar energy management and recycling play a crucial role in transitioning to a sustainable future. As the world continues to grapple with climate change and greenhouse gas emissions, solar energy offers a clean and renewable alternative to fossil fuels. By efficiently managing solar energy and recycling decommissioned panels, we can maximize its benefits and minimize environmental impact.

The future of solar energy management lies in the integration of smart grids and energy storage systems, which can optimize the use of solar power and ensure a reliable supply of electricity. Advancements in recycling technologies also offer promising solutions for properly disposing and recovering materials from decommissioned solar panels.

Efficient solar energy management and recycling offer economic benefits, such as cost savings and job creation, while also reducing greenhouse gas emissions and promoting resource conservation. However, some challenges need to be addressed, such as the high initial cost of solar panels and the limited lifespan of panels. Continued investment and innovation in solar energy management and recycling are essential to overcome these challenges and realize the full potential of solar energy in the fight against climate change.

Houzeo Reviews: Should You List With This Flat Fee MLS Company?

Houzeo is a tech-centric For Sale By Owner (FSBO) company that helps sellers list their homes. It offers affordable Flat Fee MLS listing packages that help sellers save 3% listing commission.

Houzeo has become a popular option among home sellers in the past 3-4 years. The company has garnered a 4.9-star rating and over 4,000 positive customer reviews in a short span of time. 

Many believe Houzeo is on the path to becoming the next big thing in the real estate industry. Is this true? Does the company justify the 4.9-star rating? Read our take on Houzeo reviews to get all the answers.

Is Houzeo Legit?

Yes, Houzeo is a legitimate company headquartered in the Big Apple. The company was founded in 2017 and has helped over 10,000 sellers save thousands in listing commissions. Houzeo offers its Flat Fee MLS services in 47 states and DC.

-> Is Houzeo Legit: Read to know more.

Should You List With Houzeo?

We recommend Houzeo for all home sellers. The company offers 4 MLS listing packages; you can choose from the four based on your expertise in an FSBO sale. Though the company relies heavily on tech, Boomers and Gen Xers find their technology user-friendly.

Houzeo’s listing packages range from $349 to $399, with 0.5% to 1% closing fees in some states.

Unlike other Flat-Fee MLS companies that offer only an MLS listing, Houzeo offers much more to home sellers:

  • Access to their advanced tech tools
  • An option to choose additional MLS’
  • Houzeo mobile app
  • Federal and state disclosures
  • Custom yard sign

Some customer testimonials suggest home sellers have saved over $20,000 with Houzeo. Most users have praised the company’s customer service and their advanced seller dashboard.

Houzeo also has a directory of real estate professionals. This directory consists of photographers, real estate attorneys, home inspectors, etc., whom you might need during the transaction.

How Does Houzeo Compare With Other FFM Services?

FFM Company

Houzeo

Beycome

Flat Fee MLS Realty

Fizber

Listing Price

$349+

$99 – $599

$89 – $549

$270 – $295

Avg.

Rating (Out of 5)

4.9

4.5

4.2

3.5

Coverage

47 states + DC

8 states

4 states

Nationwide

How Does Houzeo Work?

Houzeo works on the Flat Fee MLS listing model, wherein home sellers can list their houses without hiring an agent.

Here’s a step-by-step process of how Houzeo lists your property on the MLS:

  1. Make an Account: You need to provide your name and email address to create a Houzeo account. Users can also register using their social media login details.
  2. Enter Property Details: Provide details like number of bedrooms, baths, square footage area, etc., and your primary contact information.
  3. Set the Asking Price: Perform a comparative market analysis to come up with an asking price. You also have the option to add a competitive buyer agent commission to incentivize buyer agents.
  4. Select an MLS Listing Plan: Choose and pay for one of the four listing plans based on your requirements.
  5. Add Photos and Property Description: Based on your listing package and the MLS, you are asked to upload photos of your property. Apart from photos, you need to add a description of your property. Houzeo provides detailed instructions about the do’s and don’ts of adding photos and descriptions.
  6. Complete the Paperwork and Review the Draft Listing: Paperwork includes seller disclosures, listing agreement, MLS data input form, etc. Post this, a draft listing is assigned to you. Based on how quickly you review the draft listing, your property is listed on the MLS.

Houzeo Reviews: Complete Analysis

Here’s how Houzeo performs on the individual parameters:

Coverage – 4.7/5

Houzeo offers Flat Fee MLS listing in 47 states and DC. This also includes Alaska and Hawaii, which are covered by very few MLS listing services. The company doesn’t cover Wyoming, South Dakota, and West Virginia.

Cost – 4.8/5

The company offers 4 MLS listing packages starting from $349. In some states, sellers have to pay a percentage of the sale amount at closing. Houzeo discloses all the costs upfront on the pricing page and charges no hidden fees.

In comparison to other listing services, Houzeo’s listing packages are a bit expensive. But, the excellent customer reviews suggest the company’s services are worth the price.

Exposure – 5/5

Houzeo gets your home listed on the MLS in less than 24 hours. Your property listing also gets syndicated to popular real estate websites like Zillow, Realtor.com, Redfin, Trulia, etc. Sellers also get a listing on Houzeo’s For Sale By Owner page.

Technology – 5/5

Houzeo has a very powerful tech stack that will help you sell your home FSBO. 

  • Houzeo Showings: It allows you to set slots for buyers and buyer agents to book showings. You can accept, reject, and reschedule showing requests. The buyer or the buyer agent can also give you feedback on your home. 
  • Houzeo Offers: It summarizes the most important metrics of an offer. With Houzeo Offers, you can review, compare, and negotiate offers. You can also ask for the highest and the best offer from the buyers, in case of multiple offers. 
  • Houzeo Mobile App: Houzeo is one of the few Flat-Fee MLS companies that offer MLS listing via a mobile app. You get notified after every step in the transaction. Sellers can also manage showings through the Houzeo mobile app. 
  • IntelliList Listing Management: This is Houzeo’s listing management system which simplifies the MLS listing process. It helps you in pricing, filling out the property description, setting buyer agent commission, etc.

Customer Reviews – 4.9/5

Houzeo has a 4.9-star rating on Google and Trustpilot. More than 5,000 users have given positive reviews on the company’s website.

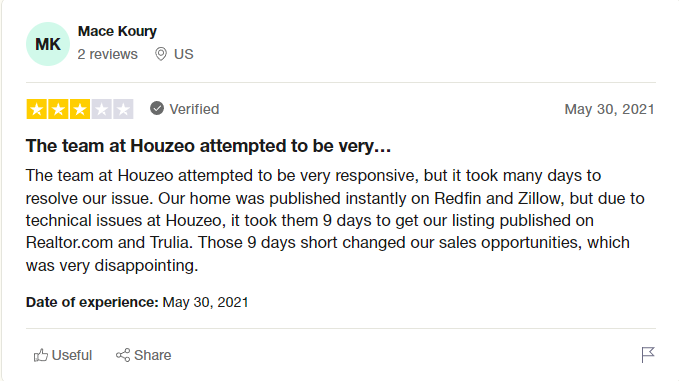
Houzeo’s customer support team is known for their prompt replies. Here’s one of the many Houzeo reviews of a user who received a follow-up quickly.

Some sellers have sold multiple properties with Houzeo due to excellent customer service and fast MLS listing.

Houzeo’s representatives patiently guide home sellers through the registration and the selling process.

In some instances, Houzeo’s prompt customer service could not satisfy the users completely. In one example, despite the responsiveness of the team, it took more than 9 days to syndicate the seller’s property listing on Realtor.com and Trulia.


Houzeo Pros

Here are the reasons why one should choose Houzeo:

  • You can complete your listing 100% online: From registration to listing upgrades, everything is virtual.  
  • Your home gets maximum exposure: Your listing gets featured on other real estate websites like Zillow, Trulia, Realtor, and over 100 real estate websites.
  • You can manage your listing on the go: With the Houzeo mobile app, you can list your property through your phone. You can also accept, reject, or reschedule showing requests through the Houzeo mobile application.
  • You can cancel your listing easily: Houzeo has a flexible cancellation policy. You need not pay any cancellation fee. But, for the homes listed on the GA-MLS sellers have to pay a $25 listing termination fee. 

Houzeo Cons

Houzeo isn’t a good option if:

  • You want to list a rental property: Houzeo lists properties that are meant for sale. The company doesn’t offer anything for renters.
  • You want to list properties in SD, WY, and WV: Houzeo has no coverage in these states.

Bottom Line

Houzeo tackles all the challenges involved in an FSBO sale. For seller queries, Houzeo has a strong customer service team. For listing documents, Houzeo’s IntelliList Listing Management system auto-populates most of the data. For negotiations, you can use Houzeo Offers.

During our research, we did not come across major Houzeo complaints. Also, the company discloses all costs upfront, with no hidden fees. This reflects the company’s transparent and user-friendly policies.

Your Complete Guide to Home Air Conditioning

If you’ve ever pondered the question, “What’s the go with my home air conditioning unit?ā€, then you’re in the right place. Today we’re tackling the intricacies of home air conditioning – from its inner workings to the steps to keep it running smoothly, this is your complete guide.

How Air Conditioning Works

To cut through the jargon, the air conditioning system in your home follows the principles of refrigeration to provide you with that deliciously cool air. Today, we’re going to break down this mystery into four simple stages, highlighting how each component plays a part in the overall cooling process. So, let’s dive in!

The Compressor: Where the Magic Begins

Consider the compressor as the heart of your air conditioning unit. It starts its home cooling process by pressurising refrigerant gas. Once pressurised, the compressor heats up, and along with the now-pressurised refrigerant gas, the next phase unfolds. 

The Condenser: Transformation Time

The hot and pressurised gas from the compressor then moves to the condenser. The condenser, usually located outdoors, cools down the heated gas with the help of a fan. During this process, our gas transforms into a high-pressure liquid. Exciting, right? But hold your horses, the adventure’s only halfway!

The Expansion Valve: The Pressure Drop

This transformed liquid refrigerant is now pushed through the expansion valve. Here, it experiences a sudden drop in pressure. This pressure change prepares the refrigerant for its next major shift.

The Evaporator: The Birth of Cool Air

Post-expansion valve, the refrigerant makes its way into the evaporator. Now, due to the lowered pressure, our high-pressure liquid turns back into a gas. However, as it evaporates, it also drops down in temperature. The fan in your air conditioning unit then blows air over this cold coil, and voila, the air gets cooled and is delivered back into your home!

Let’s Talk Filters

Next up in our guide – the importance of filters. Filters act as gatekeepers, keeping out undesirables like dust and allergens. But they can’t do their job properly if they’re clogged. Think of it as battling through an obstacle-ridden fun run; you’re slower and will use up more energy. Same with your AC unit. The accumulated gunk makes it work harder, which sadly, will spike your utility bills. 

That’s why understanding the Importance of Cleaning Your Air Conditioner Filter is vital. Regular cleaning of these filters is a must if you wish to keep your unit running efficiently.

Taking Care of Your Air Conditioning System

No matter how busy we are, it pays to keep your AC unit in pristine condition. After all, a well-functioning AC equates to a comfortable indoor climate. If this task seems overwhelming, we got your back! Here are some simple, no-nonsense ways on how to keep your AC unit up and running:

Regular Cleaning: Your First Line of Defence

Keeping your air conditioning unit clean is the first step towards ensuring its efficient operation. You’d be surprised how dust, dirt and other undesirables can make your system work harder, increasing energy consumption and shortening its lifespan. So grab a damp cloth and dust off your unit today. Remember, a little elbow grease goes a long way!

Filter Maintenance: Breathe Easy

Simply put, a clean filter means clean air. Regularly cleaning or replacing your filters not only improves air quality but also enhances airflow, reducing energy use and protecting your air conditioning system from unnecessary wear and tear. So the next time you’re waiting for your tea to brew, take a few minutes to check your filter.

Thermostat Management: A Simple Hack

Guess what? Small adjustments to your thermostat can lead to significant savings and a more efficient system. Here’s a secret – the closer your indoor temperature is to the temperature outside, the less work your AC has to do, which translates to less electricity bills. So the next time you work around your thermostat, set it to just the right temperature – not too hot but not too cold, and your AC (and wallet!) will thank you for it.

Regular Professional Check-Ups: The Lifeline

Lastly, engaging professional help for annual maintenance is a proactive approach to prolong the life of your air conditioning system. Technicians, like our trusted folk at After Hours Air Conditioning, can spot potential issues before these turn to expensive repairs.

Professional Maintenance and Efficiency

Proper positioning goes a long way in running an efficient air conditioning system. Position it in well-ventilated and shaded areas. This ensures the condenser can disperse heat effectively.

In addition to this, regular maintenance is an absolute game-changer in achieving peak efficiency and longevity of your AC unit. It’s worth engaging experts from After Hours Air Conditioning for routine maintenance checks. They’ll likely catch any potential problems before they can escalate into costly major repairs.

Wrapping Up

That’s all folks! An in-depth, clear, and straightforward guide to home air conditioning. Remember, early attention and preventive care can help you avoid a warm house in the middle of a sizzling Aussie summer. Give your AC unit a pat today and say, ā€œgood jobā€ for the great work it does!

Efficient Solutions to Successful Portfolio Management

If you’ve got a property portfolio, or you are planning to build one eventually, you have to get serious about managing it efficiently.

There are plenty of tactics to deploy and tools to leverage in order to achieve this, but you need to know about them before you can reap the benefits. So stick around and we’ll let you in on some secrets that successful insiders use to flourish.

Understanding Portfolio Management Basics

Successful portfolio management begins with a clear understanding of the fundamentals. Think of your property investment portfolio as a strategic game. Your properties are your team players, and you are their coach.

As with any sport, tactics and strategies play vital roles in winning games and yielding profitable results in real estate investments. Therefore, knowing how to efficiently juggle multiple properties becomes essential if you want to come out on top.

It’s not always about owning as many properties as you can but maximizing the return on each asset within your portfolio through detailed attention and effective decision making.

In this context, being an exceptional manager involves devising savvy techniques that ensure steady cash flow, minimal vacancies, and proper maintenance scheduling, all of which contribute towards enhancing profitability over time. It’s also a way of overcoming behavioral biases that might cloud your judgment otherwise.

Mastering the Contact Schedule for Improved Communication

When managing a property portfolio, an important step is maintaining strong relationships with your contacts. This may include tenants, contractors, realtors, and stakeholders. A well-organized contact schedule can streamline these interactions, ensuring every conversation works towards enhancing the harmony and ROI of your property portfolio.

Using business VoIP solutions is sensible in this scenario. These platforms provide concise call handling capabilities that save time while offering additional features such as video conferencing and direct messaging. With cloud-based accessibility and multi-device compatibility, reaching key contacts from anywhere becomes simpler than ever before.

In essence, incorporating reliable technologies into your management routine not only bolsters efficiency, but also signals to all parties involved that you’re dedicated to clear communication.

The Importance of Regular Property Maintenance and Upkeep


Overlooking property maintenance can lead to severe challenges in managing a successful real estate portfolio. To secure prolonged tenancies and high property values, maintaining your properties at their optimal condition is crucial.

Effective ways to ensure this includes:

  • Conducting regular inspections: This allows timely detection of issues that might elevate costs if left unresolved.
  • Investing In preventive measures: Routine pest control checks or gutter clearances, for example, can prevent larger problems down the line.
  • Prompt repair works: Delaying minor repairs often results in major fixes that come with substantial expenses.

With these pointers, you create an impression of professionally managed properties which attract better tenants and pay dividends in the long run. It’s a case of steering clear of false economies, as they’ll only come back to bite you with bigger bills and more headaches in the coming weeks, months or years.

Budgeting and Cash Flow Planning

Sound financial management is a cornerstone of investing in rental property. It involves not just collecting rent, but also developing comprehensive budget plans as well as strategies for uninterrupted cash flow.

Key tips include:

  • Creating realistic budgets: This should encompass all possible expenses alongside potential income from each property in your portfolio.
  • Monitoring outgoing expenses: Regularly track management costs, maintenance charges, and any unexpected outlays that arise.
  • Ensuring positive cash flow: Rent should ideally exceed mortgage repayments and other routine expenditures.

In doing all this, you can navigate financial challenges effectively while maintaining a profitable investment portfolio. Solid financial groundwork gives you flexibility to face sudden market changes or unforeseen circumstances with more confidence.

Strategies for Effective Risk Mitigation

Investing in property comes with its own share of risks. However, the key lies not in avoiding these hazards but rather learning to effectively mitigate them. This is fundamental to maintaining a healthy portfolio.

Effective risk management strategies include:

  • Diversifying your investments: Don’t put all your eggs in one basket. Instead, ensure you have properties spread across different locations and types.
  • Embracing adequate insurance cover: Safeguard yourself against potential incidents like fire, flood damage or public liability claims.
  • Regular property valuations: Keep an eye on market trends and carry out frequent valuations of your properties.

Taking conscious measures such as these means you can reduce potential threats that may otherwise compromise the profitability of your property investments.

Final Thoughts

As we’ve outlined, achieving success in portfolio management is about leveraging smart strategies across multiple disciplines. Balancing the basics with advanced techniques lets you create a thriving property portfolio.

Aspects like steady and structured communication with stakeholders, regular maintenance, strategic financial planning and integrated risk assessment are vital rungs on your ladder to successful real estate investing. And of course if you do make mistakes along the way, try to learn from them rather than burying your head in the sand or blaming someone else for your woes.

Metal Roof Replacement vs. Repair: What’s Best For You?

The appeal of metal roofing systems is evident – they’re durable, long-lasting, and come with a unique aesthetic. But, like all things, metal roofs don’t last forever. Years of exposure to the elements can cause wear, rust, and damage. At some point, every homeowner with a metal roof faces the critical decision: should they opt for a repair or consider a complete replacement? 

This article delves into the differences between metal roof replacement and repair and how to determine which one is best for you.  

Considering Metal Roof Replacement 

Metal roof replacement involves removing the existing metal sheets and installing new ones. It’s akin to giving your house a fresh protective shield.  

Below are the main reasons why you may opt for replacement: 

  • Age of the Roof: Metal roofs, depending on the material – steel, aluminum, copper, or zinc – can last anywhere from 40 to 70 years. If the roof is nearing its expected lifespan, replacement might be the more economical choice in the long run. 
  • Extensive Damage: If a substantial portion of the roof has been damaged, be it from a natural disaster or some other significant event, replacing it might be more feasible than repairing multiple areas. 
  • Energy Efficiency: Newer metal roofing systems are equipped with better insulation and reflectivity properties. By replacing an older roof, you might benefit from energy savings. 
  • Aesthetic Upgrade: If you’re seeking to upgrade the visual appeal or perhaps sell your home, a fresh and modern metal roof might add to that needed curb appeal. 

Knowing the benefits of metal roof replacement is important to help you make an informed decision about your roofing options.  

When Repairs Make Sense 

Repairing a metal roof involves addressing specific areas of damage or wear without replacing the entire system. Here’s when a repair might be the ideal option: 

  • Localized Damage: If the damage is limited to a small section of the roof, perhaps due to fallen debris or a minor incident, then it might be more cost-effective to simply repair that specific area. 
  • Cost-Effective: If you’re on a tight budget, repairing the problem areas can be the more affordable option, at least in the short term. 
  • Short-Term Plans: If you plan on relocating in the next few years, you might opt for repairs rather than investing in a whole new roof. 
  • Historical or Custom Roofing: Some metal roofs, especially those on historical buildings or custom-designed homes, might have unique designs or materials that you wish to preserve. 

Given these benefits, you’ll determine whether a repair is the best way to protect your home from damage, save money, and extend the lifespan of your roof. 

Factors To Weigh When Deciding Between Replacement And Repair

The decision between repair and replacement isn’t always clear-cut. Here are some pivotal factors to consider, ensuring you find the perfect solution for your roofing needs:  

  • Cost: Naturally, the cost will always be a significant determinant. While repairs are generally cheaper upfront, they might end up being more expensive in the long run if they become recurrent.  
  • Roof Lifespan: As mentioned earlier, if the roof is nearing its end-of-life, it might be financially wise to consider a replacement now rather than spending on frequent repairs. For example, if metal roofing is 35 years old and nearing the shorter end of its expected lifespan, a replacement can provide you peace of mind for the next several years that your roof will last much longer.  
  • Future Plans: Consider how long you intend to stay in the home. If selling is on the horizon, a new roof might boost your home’s market value. 
  • Warranty: If the repairs for your metal roof are covered under its warranty, it could be a cost-effective solution. For instance, if your roof is installed with a 40-year warranty, you can save on costly repairs if the warranty is valid.  
  • Local Climate: If the roof frequently faces harsh weather conditions – be it heavy snowfall, hail, or intense sun – a more resilient, newer roof might stand up to these conditions better than an older one.  

Ultimately, the decision of whether to repair or replace your metal roof is a personal one. You should weigh all of the factors involved and make the decision that’s best for you and your budget. If you’re unsure, you can consult with a roofing expert to gain more insights.  

Professional Inspection: A Critical Step 

Typically, homeowners find it challenging to evaluate the extent of the damage and make an informed decision. Therefore, always start with a professional roof inspection. Experts can provide a detailed analysis of the current condition, potential problem areas, and recommendations for the most suitable course of action. 

For instance, roofing inspectors will look at the following during an inspection: 

  • Leaks: Metal roofs are very good at shedding water, but they can still leak if there are any problems with the seams, flashing, or other components of the roof. A professional inspector will check for leaks in all areas of the roof, including the valleys, ridges, and around vents and chimneys. 
  • Loose panels: Loose panels can permit water to seep beneath the roof, causing corrosion. A professional inspector will check all of the panels on the roof to ensure they’re tight and secure. 
  • Corrosion: Metal roofs can corrode over time, especially in humid climates. A professional inspector will examine for any signs of corrosion on the roof, such as rust or peeling paint. 

If you have any concerns about the condition of your metal roof, you should schedule a professional inspection. 

Potential Challenges Associated With Replacement And Repair 

While both repair and replacement have their merits, you should be aware of some potential challenges. These include: 

  • Matching Materials: If opting for a repair, it might be difficult to find a perfect match for older or unique roofing materials. In this case, a replacement would be a viable solution.  
  • Underlying Issues: Sometimes, the visible damage is just the tip of the iceberg. There could be more severe underlying problems that only a replacement might remedy, potentially saving money in the long run.
  • Temporary Fix: Repairs, while cost-effective, might serve as a temporary solution. The need for frequent maintenance might become a reality, which could be both time-consuming and expensive in the long haul. 

When you’re aware of the potential challenges involved, you can make more informed decisions about whether to replace or repair your metal roof. 

Final Thoughts 

In the great debate of metal roof repair versus replacement, there’s no one-size-fits-all answer. Each home, roof, and situation are unique. By weighing the pros and cons of each option and taking into consideration your individual circumstances and future plans, you can arrive at a decision that offers both peace of mind and financial prudence. 

Furthermore, whether considering repair or replacement, always prioritize professional consultation and services. A well-maintained metal roofing system not only protects the house from the elements but also contributes to its aesthetic appeal and overall value.

Keep Your Expenses Low: 5 Ways To Maintain Your ACs Before It’s Too Late

Keeping a cool home is a priority for your comfort when the scorching summer months come closer. Air conditioning (AC) units are the best tool to successfully create an optimal indoor climate. However, overuse, mismanagement, or malfunctioning components can create an expensive problem. Repairing AC units can become a costly service over time, especially when combined with the higher energy bills associated with overworked systems. 

To avoid unexpected expenses and ensure that your ACs perform optimally, it is crucial to engage in regular maintenance. This blog post will provide five simple ways you can maintain your AC before it is too late for your comfort and wallet.

1. Regular Cleaning and Filter Replacement

While this solution may seem too simple to be true, giving your AC a regular clean and replacing the filters frequently can effectively maintain the unit’s operations. This is because filters tend to collect dirt, dust, and debris over time, clogging their airways and reducing the system’s efficiency. This clogging encourages an AC unit to work harder in order to keep a home cool, leading to higher energy consumption and potential damage.

To prevent this from happening, make sure to check your AC filters every 1-2 months and replace them when they appear dirty. Otherwise, most models should be replaced every 3 months. You may need to increase this frequency if you live in an area with higher concentrations of dust or pollen.

2. Annual Professional Inspection

Getting an expert to inspect your AC system is one of the surest ways to ensure everything is consistently running smoothly. Professional HVAC technicians can identify and address most AC issues early, preventing them from becoming more significant and expensive problems. 

Most inspections have technicians performing:

  • Checks for leaks
  • A coil cleaning
  • Tests on the thermostat
  • An oversight as to whether all unit components are in good working order

Regular professional inspections can also extend the lifespan of your AC system, removing the need for aircon repair unless absolutely necessary. This step may seem like an unnecessary expense, but being proactive is more than likely to save you money in the long run by preventing major breakdowns and increasing your system’s efficiency.

3. Keep the Coils Clean

The coils in your AC system are responsible for heat exchange, and dirty coils prevent your AC unit from performing optimally. Typically, dirt, dust, and debris accumulates over time to make these coils dirty. This, in turn, insulates the, and hinders the heat exchange process. When this happens, your AC unit will have to work harder to cool your home, leading to higher energy bills.

Taking the time to clean these coils on a regular basis will thus help keep your expenses low. The process is simple enough to do with care:

  1. Turn off the power to your AC unit
  2. Carefully remove debris from the coil with a soft brush
  3. Apply coil cleaner or a mixture of warm water and mild detergent
  4. Rinse and dry the coils completely before turning the power back on

4. Ensure Proper Insulation

Your AC unit is not the only aspect to consider when it comes to saving money while keeping your home cool. Proper insulation in your home can prevent the cool air created by your AC from escaping, stopping the system from overworking and consuming more energy. When a home is not properly insulated, you are more likely to face increased energy costs and unnecessary wear and tear on your AC.

Assess your home’s current insulation and address any issues or gaps you may have. Common problem areas in a home include:

  • Gaps around the doors and windows
  • Attics
  • Crawl spaces

You can improve your home’s insulation by taking steps to seal gaps and add weather stripping. This, in turn, will create a more energy-efficient home and reduce the strain on your AC system.

5. Monitor Thermostat Settings

The efficiency of your AC may also be impacted by the management of your thermostat. For example, when a thermostat is set too low, your AC unit is more likely to consume excessive amounts of energy. Always try to set a reasonable temperature that will not chew through your energy, while still bringing you comfort.

If you need a hand in finding the right temperature balance, you can invest in a programmable thermostat that allows you to create a cooling schedule that aligns with your daily routine. Having a set schedule for your AC will ensure it only runs when needed, conserving energy and money whenever you are away.

Otherwise, you can try setting your AC to an average temperature that will not run up your electricity bill. You can still keep the home cool, however, by using it in conjunction with ceiling fans to take advantage of the wind-chill effect. This allows you to raise the thermostat setting without sacrificing comfort.

Air Conditioning Maintenance

It does not have to be an expensive or complicated process to stay up-to-date with your AC’s maintenance. Rather, simple steps as those outlined in this blog post can help you keep your expenses low while still enjoying a comfortable, energy-efficient home. Avoid unexpected repair costs and surprisingly high energy bills by putting some time and effort into extending the lifespan of your AC units. Do noy wait until it is too late – take action now to ensure your ACs are in top shape for the upcoming summer months.

A Guide to Profitable DAI to FTM Transactions

Cryptocurrencies unlocked the world of decentralized finance, and this industry has attracted millions of users worldwide. DeFi offers many earning opportunities, and considerable gains are possible if you make strategic transactions. So, is it wise to convert DAI to FTM?

It depends on the market situation and how the transaction fits your strategy. To better understand both assets, we have a guide that will reveal more about DAI and FTM. Keep reading to discover more details about these tokens and projects!

What Is DAI?

Dai is an algorithmic stablecoin issued on the Ethereum network. It’s connected to the US dollar and it aims to keep the 1:1 value. Instead of keeping fiat reserves like BUSD, DAI uses smart contracts for locking crypto assets to keep the token’s worth. 

The token is decentralized and uses algorithms that recognize market changes and perform adjustments to maintain a steady price. DAI uses stabilization mechanisms like CDP smart contracts and the MKR token.

DAI’s current price is $0.99 and its market cap is $5.34 billion. There’s no maximum supply, with the current coins in circulation set at around 5.34 billion. If you’d like to compare this token to RippleLite, you can check the XPL price and learn more about its changes. 

What Is FTM?

Fantom is a blockchain platform powered by smart contracts and using an original Lachesis PoS consensus mechanism. Its main goal is to offer a decentralized and secure option that will resolve scalability issues traditional platforms like Ethereum have.

FTM coin serves for payments and covering the network fees, as well as for governance and voting on crucial decisions. Users can stake FTM tokens and become validators to earn rewards.

A single FTM token is worth $0.212. About 88% of the total token supply is in circulation, with the maximum set at 3.175 billion FTM coins. The project’s market cap is $568 million.

Factors Influencing Profitable Transactions

Before you choose to convert DAI to FTM, read the following paragraphs to learn which factors can influence the transaction’s profitability!

Market Timing

The crypto market is famous for its volatility, and coin prices can change quickly. That’s why leveraging favorable market conditions and recognizing the right trading moment is imperative. 

Leading technical indicators can help you determine future price fluctuations based on analyzing current factors. RSI, or relative strength index, and stochastic oscillator are some indicators worth using. Combine them with lagging indicators like Bollinger Bands and moving averages. These show trends from analyzing previous market data to give you more details about the desired token.

Transaction Fees

Each trade performed via a crypto exchange comes with a transaction fee. Your goal is to reduce these charges as much as possible to maximize profitability. You can try to look for low-fee networks when trading crypto coins. It’s also better to identify off-peak times when there’s no network congestion. If you avoid network clogs, you’ll pay less for the transaction.

Choosing the Right Exchange

The final step is to pick an exchange where you will convert DAI to FTM. First, confirm that the platform has both currencies in its portfolio. You can choose between decentralized (DEX) or centralized (CEX) exchanges, so let’s see why this selection matters!

Decentralized Exchanges

A decentralized exchange guarantees that users maintain control over their assets throughout the trading process. DEX platforms have a non-custodial approach, and they are based on trust, which minimizes the risk of hacker breaches and ensures you can’t suffer due to the platform’s liquidity issues. However, if you provide the wrong address or forget the wallet’s recovery phrase, the odds are you’ll lose funds forever.

Anonymity is another advantage offered by DEX. Most platforms won’t require you to sign up or provide personal details. All you need to execute a trade is to initiate it via the website. Popular DEX platforms that support DAI and FTM include Godex and SimpleSwap.

Centralized Exchanges

These platforms have a centralized authority that owns the exchange and is the middleman in transactions. CEX usually has a custodial approach, meaning you send the funds to their custody before the platform executes the transfer. Liquidity plays a vital role, and it’s the exchange’s task to secure it for the provided tokens. If a security breach happens or the CEX goes bankrupt, users lose their assets.

Centralized exchanges like Binance and Kraken support DAI and FTM. They have large trading volumes daily and offer simple and fast trades with an intuitive user interface. These platforms often offer crypto lending and additional financial services, but it’s necessary to register an account and provide personal data.

Your Path to Profitable DAI to FTM Transactions

The art of smart trades is in recognizing the right moment to execute a transaction. Converting DAI to FTM can be a wise call if it fits your portfolio, and your analysis confirms it’s worth acquiring Fantom tokens now. Don’t forget to rely on your intuition, too, especially since market timing is vital. Performing the transaction as soon as you identify the right moment is the way to maximize your profit from DAI to FTM transfers!