Beginner’s Guide to Fixing and Flipping a House

Fixing and flipping houses is a highly profitable business if you understand how the process works. Fixing up a home can be tricky; it’s even harder to flip it. So, before you start thinking about making money, you should take your time to learn everything that is involved.

There are many different approaches to fixing and flipping a house.

This beginners guide will help walk through every step on how to flip a house to sell quickly, the cost to flip a house as well as how to find a great investment property.

House Flipping For Beginners

Before actually jumping into a project, understand that there is more to house flipping or the BRRR method for real estate than just fixing them up. You need to have some knowledge of what you’re going to do before you even start working on them. That’s why doing some research and getting advice from other professionals will be very important for your investment journey.

Step 1 – Find Subcontractors

Surround yourself with a team of experts to help you make informed decisions. Some individuals who will provide such guidance include contractors, lawyers, moneylenders, property managers, and inspectors, among other professionals. You should also get an experienced real estate agent to take you through the buying and selling process.

Step 2 – Understand the Local Real Estate Market

Study your local real estate market and understand the nature of it. You will need to know its trends and market forces. With this study, you can make your own projections on the current state and how it will change in the future. To do this, research lots of reports on local real estate trends for your area. This research will give you great insight on what features are worth fixing and flipping with your investment property.

You will also know the market forces impacting your property and how they will affect your investment business. You should also consider studying real estate investment to have access to reliable projections on what is likely going to happen in the property market.

Step 3 – Understand How the Fixing and Flipping Process Work

Being a flipper is not just about finding cheap properties and selling them for profit afterward. It’s also about doing the necessary repairs on the property, finding contractors who can help you with these repairs, and managing general contracting on your own. While some investors choose to hire general contractors to fix the property and sell it afterward, others decide to do all the work themselves.

In this case, you will have to learn about real estate investing to perform your tasks more effectively. You should consider taking some courses through online platforms or find some business partner who knows the best methods for performing renovations. You can also learn how to save money on renovation supplies and other things that come with house flipping.

Find someone who can help you with the fixing process and help you manage the business at its early stages. The best option would be to find a knowledgeable real estate agent who can remain in charge of the property for you and manage it for until you sell it and make money.

Step 4 – Have a Business Plan and Budget

Before you start spending money on the property, prepare a detailed business plan. Make sure that everything in your plan is realistic and possible to achieve. Don’t make assumptions about things like the price of your real estate or costs of repairs. Take several quotes from real estate agents about similar properties in your area and use them as benchmarks for future estimates.

In addition, you must define your financial obligations to the property. Make a list of all costs, from maintenance to taxes and insurance payments. Also, be sure not to forget to include the real estate agent’s fees! Once you have everything on paper, compare that with your income and see if you can make monthly payments without jeopardizing your financial situation. Consider finding cheap houses for sale and get more profit when you sell them.

To understand the actual price you should pay for the property, you should use the 70:30 rule. The after repair value (ARV) is often 70% of the price you should pay, and 30% are the labor costs. The ARV will give you an estimate of the property’s actual worth after it has undergone renovations.

Step 5 – Get a Hard Money Loan

Once you’ve identified your property, have a business plan, and know your budget, it’s time to get the financing needed. A hard money loan is a perfect financing option for fixes and flips. The fix and flip loans come with a faster turnaround time, and the money you get is pooled from private investors. And since it comes with a lower interest rate, you can use the equity to purchase the property while saving some cash for renovation.

These loans come as short-term financing options for borrowers. You can usually pay them off as the house is being fixed. Once you’ve done the fixing and sold the house, you can now pay a larger payment for the hard money loan and move to your next property.

Step 6 – The Location of the Property Matters

After understanding the local real estate market, you should give the neighborhood of the property you want to buy more attention. Properties located in places where there is a high density of potential tenants are better choices. It’s even better if the area happens to have many college students or those starting their careers.

Not all properties are created equal. Just because there is an affordable place in a nice neighborhood doesn’t necessarily mean that property will automatically become a profitable investment once renovated.

The rule of thumb is to find a property in a neighborhood with a potentially bright future. The neighborhood should portray a growing community, and the area should offer the potential for a high demand for rental properties. It can also help to buy properties that are close to public transportation hubs or shopping.

Bottom Line

The decision to fix and flip a house is a great investment opportunity for anyone looking to venture into real estate. Always understand that as a beginner, you will be going up against other investors with more experience and capital. It pays to heed the wisdom of experienced pros who can point you in the right direction. It’s always a good idea to start small with the fix and flip to get your feet wet.

For more advanced topics, like BRRRR real estate, check out our blog topics related to investing.

If you’re ready to get started, SimpleShowing will be here to help you every step of the way. We have a team of experts that can help you find profitable houses to skyrocket your business. Contact us today to get started!
Advantages of a Lockbox on Your Home or Rental Property

If you’re planning on selling your home, you might want to consider getting a lockbox to help improve the security of your property while it’s on the market. As the name implies, a lockbox is a small container where the keys to the property can be stored. It has a shackle to attach the lockbox to a home’s doorknob.

Types of lockboxes

Manual, combination lockbox: These have a spin-dial or push-button panel where a combination of numbers or letters is entered to access the house keys.

Digital lockbox (Bluetooth): These offer advanced features like mobile app connectivity, key-card access, and monitoring.

Digital lockbox (Wifi): These are similar to Bluetooth locks, except you don’t need a bluetooth device/mobile phone to obtain a key.

Supra lockbox: These are the brand of digital lockboxes most commonly used by real estate agents. However, they are typically not accessible by consumers as local Realtor board membership is required to buy and use these lockboxes.

If you are selling your home, you have the option to arrange showings only by appointment or use a lockbox. In case you choose the latter, your agent will set it up. Make sure to review instructions from your agent on how to open a lock box so you can see it in action. To learn more about the advantages of using a lockbox in real estate properties, read on.

Lockboxes are convenient

One of the benefits of using a lockbox is it makes real estate showings very convenient. If you have vacated the property and there are interested buyers who want to see your home, you won’t need to meet up with the agent to give the house keys. You can leave spare keys in the lockbox and your agent along with the buyers can let themselves in.

Also, lockboxes can easily grant property access to a buyer’s broker. If you are comfortable with it, you can permit your agent to give the buyer’s broker the lockbox’s access code at an arranged schedule. With more showings, your home becomes available to a larger pool of potential buyers—which can increase the number of bids and potential selling price.

Lockboxes improve security

If the property you are selling is currently vacant, security is your prime concern. Part of your worries can be that intruders might come in and cause issues like theft and property damage. When you use a lockbox, you can ensure your property remains secure.

In case the lockbox requires entering a PIN code, ask your agent to create a unique PIN to deter unauthorized entry. If possible, request to have the code frequently changed or after every property showing as an added precaution. This adds an extra layer of security, especially when you have multiple people entering your home like contractors making repairs.

In case you use an advanced lockbox, it can serve as virtual guards. They can notify you or your agent via email if anyone tries to enter the property beyond scheduled showing times. They can even provide information like the time and date the intruder tried to enter the premises.

Lockboxes limits property access

Using a lockbox allows you to restrict access to your property. Since only a few people know the password to the lockbox, you can select specific days or times when interested clients and their agents can get the keys to look at the property.

When more advanced lockboxes are used, like those that require a smartphone app for access, your listing agent can track each time someone wants to enter your home. These types of lockboxes can record information that includes those who try to enter the property and those who were able to successfully gain access.

Lockboxes provide privacy for homebuyers, renters or Airbnb guests

Some home buyers prefer to visit and check out a listed property alone. When you or your agent is present during the showing, prospective buyers might feel a bit awkward being watched as they carefully inspect every inch of your house. They might also become hesitant to discuss freely and honestly with their partners or broker what they think about the property.

Additionally, some homebuyers can feel pressured when the property owner or their agent is following them around. Instead of having the time to mull over their choice, they can end up not purchasing the property because they feel they need to provide a decision on the spot. If you use a digital (non-agent/Supra) lockbox, you can easily accommodate private showings to interested buyers, renters or Airbnb guests anytime.

Conclusion

As a home seller or property manager, it’s best to consider the perks of using a lockbox on your property. While lockboxes keep your property safe and secure from intruders, they also make your home available to more prospective buyers.

Once you understand the type of lockbox that you’ll be using, make sure to discuss any specific instructions with your agent. Let your listing agent know if you allow home showings without your presence or if you prefer to be there while potential buyers are touring your home. This way, all expectations are clear for both parties and you can avoid any misunderstandings.

Real Estate Commissions: Everything You Need To Know

As you may know, real estate agents make their money from commissions. When agents work with clients to buy or sell properties, they take a certain percentage or flat fee of that sales price as payment for their services. Real estate commissions are not cheap, and although sellers are acutely aware of how much agents cost, most buyers aren’t aware of how these commissions factor into the sales price of a home.

Whether you’re buying or selling, it’s essential to know what these commissions are and what you can do (if anything) to minimize them!

Real Estate Commissions Are Typically Between 5-6%

The first thing that you should know about these commissions is that they typically are around 5-6%. This figure includes the commission for both the buyer’s agent and the seller’s agent. Each one usually takes about 2.5% of the home’s value for their services.

While 5% might not sound like a lot, consider that as of May 2020, the average home price in the US was $284,600. Therefore, the average homeowner paid about $14,230 in commissions.

Imagine what you could do with $14,000 extra in your pocket. That could pay for a small car (or be a nice extra down payment on your next property!).

Of course, for homes worth $500,000 or $1 million, the stakes get even higher. If you’re selling one of these properties, you could easily be looking at paying two new cars’ worth of commission.

Who Pays for These Commissions?

Technically the seller pays for all real estate commissions. However, this is somewhat misleading. When the buyer closes on a property, they’ll initiate a wire transfer to an escrow company. From the closing price, the seller has to pay specific fees. Two of those line items are the real estate commissions, one for the buyer’s agent and one for the seller’s.

So while the seller “pays” for the commission, it’s the buyer who indirectly pays for it. If there were no real estate commissions involved, the seller could accept a lower offer and make the same amount of money. Instead of taking a $250,000 offer, they could get one for $237,500 and walk away with the same amount in their pocket.

It’s a very similar concept to credit card fees. Technically the merchant pays the fees per swipe, but if there were no fees, the sellers could offer lower prices and still make the same amount of money.

How Can I Avoid Commissions?

After reading the above, you might want to avoid these commissions altogether. After all, is it worth $12,500 to sell your $250k house? That’s a lot of money to give away.

It’s tough to avoid real estate commissions entirely, but there are ways to reduce them. Here are two popular ones.

For Sale By Owner

If you’ve looked around the internet, you may have noticed some listings tagged as “for sale by owner.” These listings have no seller’s agent – the seller is doing all the work of advertising, showing the home, and typing up the contracts themselves. It’s perfectly legal to sell a home without the help of a real estate agent!

This tactic avoids the seller’s real estate commission because there’s no seller’s agent involved. It doesn’t, however, prevent the buyer’s agent commission. If the buyer comes with a real estate agent, the seller must pay the buyer’s agent commission if they accept the offer.

So the “for sale by owner” tactic only saves 2.5%-3%, not the full 5-6% commission amount. On a $250,000 home, that would be somewhere between $6,250 and $7,500. It’s not a small sum of money by any means, but not quite as impactful as saving the full 5-6%.

However, there are cons to this approach. Putting your home up as “for sale by owner” will save you money. The problem is that real estate agents do provide benefits for clients. For example, buyer’s agents know plenty of negotiating tactics to cut into the seller’s profit. Seller’s agents, of course, know these tactics and can advise clients appropriately. There’s a reason why homes sold by real estate agents tend to have higher prices than those sold by the owners.

Use a Low Commission Platform Like SimpleShowing

For most people, the problem isn’t using a real estate agent. It’s well-known that real estate agents bring a lot to the table when it comes to negotiations, legal liability shielding, and helping close deals. Agents tend to get sellers more money for their homes for far less work on the seller’s part than going it alone.

What if, therefore, the goal wasn’t to eliminate real estate commissions altogether but instead minimize them?

Fortunately, there is. SimpleShowing is a platform designed with this objective in mind.

Instead of paying a 3% listing commission, you’ll pay a 1% commission when selling. On a $250,000 home, that’s a savings of $5,000. However, you’ll still have an experienced, local agent selling your home. You’ll get all the benefits of a listing agent, just without the expense!

Buyers also receive benefits. They’ll get money towards closing costs with SimpleShowing, which incentivizes them to find your property on our search platform. It’s a win-win for everyone. You save on commissions, and the buyer saves on closing costs!

Real Estate Commissions: Not Entirely Avoidable, But Not Bad Either

There’s a common misconception that real estate commissions are somehow “bad.” They’re not. Real estate agents provide a valuable service to sellers and buyers, and they deserve some compensation for that service.

However, the old model of these commissions needing to eat up 5-6% of the home’s value is outdated. SimpleShowing can charge just 1% of the home’s value to sellers with streamlined technology and an innovative business model. Assuming the standard buyer’s commission of 3%, that means you’ll pay 4% instead of 6%. You’ll still get all the benefits of a real estate agent, though.

2% might not sound like a lot, but when you’re dealing with homes in the hundreds of thousands, it’s a lot of extra money in your pocket.

If you’re thinking of selling, give SimpleShowing a try!

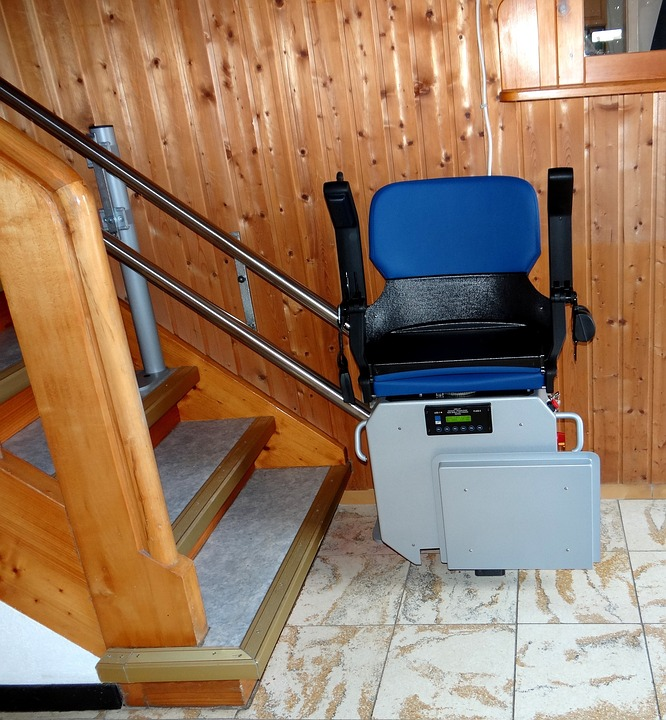
Can a Stairlift Be Moved to Another House? Here’s What to Know

If you have a stairlift in your home and are thinking about moving, you may be wondering if it can be moved to the new house. In most cases, the answer is yes – but there are some things you need to know before you start planning the move. In this blog post, we will discuss the process of removing a stairlift and how to prepare for the move. We will also talk about some of the factors that may affect whether or not a stairlift can be moved from one house to another.

1) Removing a Stairlift

Removing a stairlift is not a difficult task, but it does require some preparation and effort. The first step is to remove any furniture or other objects that are blocking access to the lift. Once the area around the lift is clear, you can begin disconnecting the cables and tubing. Make sure to label each cable and tube so that they can be reconnected properly at the new location. Next, remove the seat and footplate from the lift carriage. Finally, disconnect the power supply and lower the lift carriage down to ground level. At this point, you should have everything disconnected that needs to be disconnected – now it’s time for transportation!

2) Professional Removing Services

If you are not comfortable removing the stairlift on your own, there are professional services that can do it for you. This is often the best option if you have a complex or difficult-to-remove lift. Additionally, stairlift removal professionals will have the experience and equipment necessary to safely remove your stairlift and transport it to the new location. The cost of professional removal will vary depending on the type of lift and the company you use, but it is typically a few hundred dollars. However, it is important to note that some companies may not be able to remove your stairlift if it is a complex or older model. In this case, it is best to contact the manufacturer of your lift for specific instructions on how to remove it.

3) Preparing for the Move

Once you have decided to move the stairlift, there are a few things you need to do to prepare. First, you need to make sure that the new house has enough space for the lift. It is also important to check that the staircase in the new house is compatible with the stairlift. If it is not, you may need to purchase a new stair lift or have the staircase modified. Finally, you need to arrange for power and installation at the new location. This can typically be done by a professional removal company, but it is important to check with them beforehand.

4) Factors That Affect Stairlift Moving

There are a few factors that can affect whether or not a stairlift can be moved from one house to another. The most important factor is the compatibility of the staircase. If the staircase in the new house is not compatible with the stairlift, it will need to be modified or a new stairlift will need to be purchased. Another factor that can affect moving a stairlift is the size of the lift. Some lifts are too large to be moved without disassembly, so this is something you need to check before you begin planning the move. Finally, the age and condition of the stairlift can affect whether or not it can be moved. If the lift is very old or in poor condition, it may not be worth moving.

5) Installing Stairlift in Your New Home

Once you have moved the stairlift to your new house, you need to install it. This is typically a simple process, but it is important to follow the instructions that come with the lift. If you are not comfortable installing the lift on your own, you can hire a professional to do it for you. The cost of installation will vary depending on the type of stairlift you have. However, if you decide to do it on your own, it is usually a simple process that only takes a few hours.

6) Maintaining Your Stairlift

Once your stairlift is installed, it is important to maintain it. This includes regularly checking the batteries, tracks, and moving parts. It is also important to keep the lift clean and free of debris. If you notice any problems with the lift, it is important to contact a professional for repairs. With proper maintenance, your stairlift should last for many years.


When moving homes, there are a lot of things to think about and plan for – but don’t forget about your stairlift! If you have a stairlift in your current home, you may be wondering if it’s possible to move it to your new house. The good news is that yes, in most cases, a stairlift can be moved to another house. With the help of this article, you should be able to determine whether or not moving your stairlift is the best option for you.

4 Dos And Don’ts Of Hiring A Reliable Home Plumber

When it comes to maintaining the health and safety of your home, few decisions are as crucial as choosing the right plumber. Thus, hiring a reliable home plumber is not a task to be taken lightly. It requires careful consideration, research, and an understanding of what makes a plumber truly dependable.

This guide is crafted to navigate you through the dos and don’ts associated with finding a plumber who not only solves your current plumbing issues but also ensures the longevity and reliability of your home’s plumbing infrastructure.

The Dos Of Hiring A Plumber

Finding the right plumber transcends the simplicity of a quick internet search; it requires a series of thoughtful steps that profoundly shape the outcome. The process of discovering a professional who satisfies your technical needs while also displaying genuine care for their craftsmanship offers unparalleled peace of mind.

1. Start With Research

Embarking on a thorough research process is the first critical step. This involves:

  • Seeking Recommendations: Tap into your network of friends, family, and neighbors who have recently hired plumbers. Personal recommendations can provide valuable insights into a plumber’s reliability, work ethic, and customer service.
  • Checking Online Reviews And Ratings: Visit reputable trade websites, social media platforms, and review sites to read about other customers’ experiences. Pay attention to comments about punctuality, professionalism, and how the plumber handles unexpected issues.

2. Verify Credentials

Ensuring that a plumber is fully qualified and credentialed is non-negotiable. This step includes:

  • Licensing: Verify that the plumber holds a current license to practice in your state. A licensed plumber has met the required standards of training and competency.
  • Insurance: A reputable plumber should have liability insurance and worker’s compensation. This protects you from being liable for any accidents or injuries that occur on your property.
  • Certifications And Training: Depending on the complexity of your project, you should check if the plumber has any specialized certifications or ongoing training showcasing their commitment to their craft.

3. Get Multiple Quotes

After a plumbing inspection, obtaining quotes from several plumbers allows you to compare not just the cost but the scope of what’s included:

  • Comparing Services: Make sure you are comparing like for like. Clarify what each quote includes in terms of labor and parts and whether any guarantees or warranties are offered.
  • Understanding The Quote: A lower quote might not always be the best option if it compromises quality or completeness. Ensure you understand what each quote covers and ask for clarification on any vague points.

4. Check For Warranty And Guarantees

A plumber’s willingness to stand behind their work is a strong indicator of their reliability and quality of service:

  • Workmanship Warranty: Many reputable plumbers offer a warranty on their work for a certain period. This shows confidence in their skills and commitment to customer satisfaction.
  • Parts And Labor Guarantees: Clarify what guarantees are provided for the parts used and the labor performed. This can provide peace of mind and protect you against future problems.

The Don’ts Of Hiring A Plumber

While knowing what to do when hiring a plumber is crucial, being aware of what not to do is equally important. Avoiding the following mistakes can save you from unnecessary expenses, poor workmanship, and many other problems.

1. Don’t Accept Low-ball Offers

The allure of a significantly lower quote can be tempting, but it often comes with hidden costs or signifies a compromise in quality.

  • Quality Over Cost: A quote that seems too good to be true probably is. Skilled labor and quality parts cost money, and cutting corners can lead to more expensive repairs down the line.
  • Comprehensive Quotes: Ensure that the quote includes all aspects of the job. Some low-ball offers may only cover some necessary work, leading to unexpected charges later.

2. Don’t Ignore Online Presence

In today’s digital age, a professional online presence can provide insights into a plumber’s credibility and work ethic.

  • Professional Website And Social Media: A well-maintained website and active social media accounts can indicate a plumber’s commitment to their profession and provide a platform for customer feedback and work samples.
  • Red Flags In Reviews: While no business is immune to the occasional negative review, a pattern of complaints regarding quality, professionalism, or ethics should raise concerns.

3. Don’t Skip The References

Direct feedback from past clients can offer invaluable insights into a plumber’s reliability and quality of work.

  • Value Of Speaking To Past Clients: Ask for references and take the time to contact them. Inquire about their experience with the plumber, including the quality of work, punctuality, and communication.
  • Specific Questions: Tailor your questions to uncover information that’s most relevant to your project and concerns.

4. Don’t Rush The Process

Hiring in haste can lead to overlooking crucial details, potentially resulting in hiring someone who doesn’t meet your standards.

  • Informed Decisions Take Time: Allow yourself sufficient time to research and evaluate different plumbers. Rushed decisions can lead to missed red flags or settling for subpar service.
  • Comparative Analysis: Use the time to compare multiple plumbers, weighing their pros and cons in relation to your specific needs and project requirements.

Conclusion

The task of finding a reliable home plumber is a nuanced endeavor that extends beyond mere checklists; it demands careful consideration of the various dos and don’ts mentioned above. As such, this comprehensive approach will not only save you time and money but also ensure that your plumbing needs are addressed with the highest standards of professionalism and care.

Moving Guide to Columbus, GA

People have different opinions and preferences when it comes to choosing a town to live in. Some are looking for a family-friendly destination with good schools, while others seek low cost of living and jobs opportunities. When moving to Columbus, Georgia, you can expect all of those things along charming neighborhoods and welcoming community.

If you are moving to Columbus, GA, you likely need to know what to expect about the city that will soon become the place you call home. To help you out, our team has put together a moving guide to Columbus to give you an idea of things you should know and expect before moving.

Cost of Living

One of the most significant advantages you’ll find when moving to Columbus is the affordable cost of living. The cost of living in Columbus is lower than the national average and much lower than other US cities with a low cost of living. For example, the median home value in Columbus is $125,000, with the average listing price being $200,000. In addition, the home closing costs here are good, making home selling and buying easy.

The cost of housing, among other things in Columbus, is also below the national average except for the utilities. The cost of utilities is approximately $300 per month, but this also depends on the size of your home. It’s safe to say that how affordable Columbus will be for you also depends on where you’re moving from.

Schools in Columbus

Are you moving to Columbus with your family? Do you have school-aged children? Luckily, there is no need worry about the schools your kids will attend. Columbus is overflowing with good schools. There are 60+ schools in the area recording excellent academic performance.

The schools are served by Muscogee County School District that starts from pre-K through 12th grade. So, if you have young children just beginning their education, Columbus is a great place to give them a strong foundation. In addition, there are also many choices at your disposal for higher education students, including Columbus State University and the Columbus Technical College.

Columbus Neighborhoods

Columbus provides you with some of the best neighborhoods in Georgia. It has excellent homes and places that suit your lifestyle and fits into the needs of your family. Are you looking for proximity to schools, walkability, or cheap housing? The neighborhoods in Columbus provide you with wonderful home options, but you have to choose according to your needs and lifestyle.

Many people who move to Columbus choose to settle in and around the city’s downtown area. This is the city’s business district with many historic districts, grand churches, and single-family residences. However, if you want a quieter and peaceful lifestyle, you can move to East Columbus. This is where you’re going to find great homes with the beautiful Bull Greek Golf Course.

Those who prefer even more peace and fresh air can choose the suburban lifestyle by moving to North Columbus. This place introduces residents to the established neighborhoods of Allendale and Green Island Hills. This is also the place you will see newly built subdivisions.

Weather in Columbus

Like the majority of cities in Georgia, the weather tends to be comfortable all year round. Well, there are still a few freezing days, but they’re not too bad.  The cold temperatures in Columbus are very short-lived, so you don’t have to worry if you can’t stand the chilly weather. The winter temperatures are as high as 30 degrees, but they can warm up to 50’s or 60’s.

Being in Georgia, there are going to be hot months like June and September, but the temperatures are still manageable. Summer temperatures tend to stay between 80 and 90 degrees. On hot days, you can find shelter on the beautiful shade trees that tend to keep the climate in the area cool enough for residents to enjoy.

Outdoor Activities

It’s never a dull day in Columbus for those who don’t like spending their free days at home. Columbus is a city that’s always entertaining. With beautiful weather in Columbus, you can go out any day and enjoy your outdoor adventures.

If you enjoy hunting, Columbus is home to plenty of fun hunting grounds nearby. For bikers and hikers, Columbus is the place to be with plenty of trails to explore such as the Columbus Fall Line and Black Heritage Trail. With the Chatahoochee River nearby, residents have plenty of great opportunities to whitewhater raft, kayak, zip line, or stroll along the city’s beloved 15-mile Columbus RiverWalk.

Columbus is also home to over fifty local parks. If you want a park full of activities like mountain biking, disc golf, cross-country running, and picnicking, Flat Rock Park has you covered. There is also the Standing Boy Creek State Park, where  activities include hiking, hunting, and wildlife watching. There are also several incredible golf courses for those wanting to practice their swing or play on the green.

Community and Culture

If you’re wondering about the community and culture of Columbus, you are sure to  be very pleased with what you find. As a city with a rich military background due to its proximity to Fort Benning army base, Columbus, is home to several fascinating military museums. These include the Columbus Museum, the National Civil Museum, and the National Civil War Museum.

Like most southern city’s, Columbus offers a warm, welcoming, and supportive community. Despite it rich history, Columbus also offers a good mix of new developments to create a unique city atmosphere that residents love.

If a community center is what you seek, look no further than Uptown Columbus. Here, you will find shopping, dining, tourism, and entertainment right along the Chatahoochee River. Historic Uptown Columbus offers plenty of lodging, nightlife scene, and entertainment in a charming hometown atmosphere. The area also hosts open-air markets, concert series, and frequent community events.

Other Things Columbus Has to Offer

Moving to Columbus, GA, the third largest city in the state, offers a delightful blend of urban vibrancy and rural charm. Downtown Columbus is a hub of activity, showcasing a rich tapestry of locally-owned businesses and the historic Springer Opera House, adding a touch of cultural flair. Its proximity to Phenix City ensures that residents get the best of both worlds.

The city village vibe offers a range of single-family homes, making it a top choice for young families, especially with its notable public schools. The legacy of Bibb City, rooted deeply in the history of the Bibb Manufacturing Company, is an essential part of Columbus’s fabric, providing insights into its past and how it has shaped the present.

If you’re a lover of outdoor sports and walking trails, Columbus won’t disappoint, while those inclined towards a rural lifestyle will find peace in the city’s quieter regions. Among the best neighborhoods, Bibb City stands out with its rich history and evolving landscape. Moreover, military families will find Columbus accommodating due to its supportive community and facilities.

The convenience of a local movie theater, grocery stores, and an exciting nightlife ensure that there’s never a dull moment in Columbus. Whether you’re searching for a lively city’s pulse or the serene rhythm of a smaller community, Columbus, GA has it all.

Are You Ready to Move?

So, are you ready to move to Columbus, Georgia? Now that you already know what to expect in terms of the cost of living, neighborhood, schools, activities and more, moving to Columbus should be a breeze. Whether you are single or have a family, you are sure to enjoy this friendly, open, and inviting Georgia town.

If you’re planning to move to Columbus and wondering where you can find a house to buy, we can help you with that. Our knowledgable agents at SimpleShowing will help you hunt for perfect homes in the best Columbus neighborhoods and see to it that you settle comfortably. Don’t hesitate to get in touch with us!

Conclusion

We reaffirm that relocating to Columbus, GA is a remarkable choice. The Muscogee County School District, with a variety of high-quality middle schools and elementary schools, is an excellent provision for your children’s education. Combine that with the presence of esteemed higher education institutions such as Columbus State University and Columbus Technical College, and you have a city that embraces the power of knowledge.

Famously known as the Fountain City, Columbus, GA boasts attractions such as the National Infantry Museum and the Chattahoochee River, offering a rich blend of culture, history, and outdoor fun. Its city’s central business district is not only an economic hub but a showcase of architectural beauty inspired by the city’s namesake, the explorer Christopher Columbus. The efficient connectivity provided by the Columbus Airport and the intercity bus service further enhances the convenience of this vibrant Georgia city.

In conclusion, Columbus, GA embodies the spirit of a contemporary city rooted in historical elegance. Whether you’re seeking superior educational opportunities, a thriving job market, or diverse recreational options, Columbus ensures your needs are catered to, making the transition into your new home seamless and rewarding.

Pink Houseplants: Adding a Pop of Color to Your Indoor Garden

Pink houseplants are becoming increasingly popular among plant enthusiasts. These plants add a pop of color to any room and are a great way to bring some life into a space. The trend towards pink houseplants is a reflection of the growing interest in unique and exotic plants that are both visually appealing and easy to care for.

One of the most popular pink houseplants is the Pink Princess Philodendron. This plant has beautiful pink variegation on its leaves and is a great addition to any collection. Other popular pink houseplants include the Pink Syngonium, Pink Fittonia, and Pink Aglaonema. These plants are all relatively easy to care for and add a touch of color to any room.

While pink houseplants are certainly trendy, they are also a great choice for those who are looking to improve their indoor air quality. Plants are natural air purifiers, and having a few pink houseplants around the home can help to remove harmful toxins from the air. Additionally, caring for plants can be a relaxing and rewarding hobby that can help to reduce stress and improve overall well-being.

Benefits of Pink Houseplants

Pink houseplants not only add a pop of color to your home décor, but they also come with numerous benefits. Here are a few reasons why you should consider adding pink houseplants to your indoor garden:

1. Air Purification

Just like other houseplants, pink houseplants can help purify the air in your home. They absorb toxins and pollutants from the air and release clean oxygen, making the air in your home healthier to breathe.

2. Stress Reduction

Studies have shown that having plants in your home can help reduce stress levels. The color pink is also known for its calming effect on the mind and body. So, having pink houseplants in your home can help create a peaceful and relaxing environment.

3. Mood Enhancement

The color pink is associated with happiness and positivity. Having pink houseplants in your home can help boost your mood and create a cheerful atmosphere.

4. Aesthetically Pleasing

Pink houseplants come in a variety of shades and textures, making them a great addition to any home décor. They can be used as a focal point or as a complementary accent to other décor elements. In conclusion, pink houseplants not only add beauty to your home, but they also provide numerous benefits for your health and well-being. Consider adding a few pink houseplants to your indoor garden to enjoy these benefits and enhance your home décor.

Popular Pink Houseplants

Pink Aglaonema

Pink Aglaonema is a stunning houseplant that features pink and green variegated leaves. This plant is easy to care for and can thrive in low-light conditions. It is a great choice for those who want to add a touch of pink to their indoor space without much effort. Pink Aglaonema is also known for its air-purifying properties, making it a great addition to any home or office.

Pink Caladium

Pink Caladium is a popular houseplant that is known for its heart-shaped leaves with pink veins. This plant is easy to care for and can be grown in a variety of lighting conditions. It is a great choice for those who want to add a pop of color to their indoor space. Pink Caladium is also a great choice for those who want to add a tropical feel to their home or office.

Pink Syngonium

Pink Syngonium is a beautiful houseplant that features pink and green variegated leaves. This plant is easy to care for and can be grown in a variety of lighting conditions. It is a great choice for those who want to add a touch of pink to their indoor space. Pink Syngonium is also known for its air-purifying properties, making it a great addition to any home or office.

Overall, these three pink houseplants are great choices for those who want to add a touch of pink to their indoor space. They are easy to care for and can thrive in a variety of lighting conditions. With their air-purifying properties, they can also help improve the air quality in your home or office.

Care for Pink Houseplants

Lighting Requirements

Pink houseplants require bright, indirect light to thrive. Direct sunlight can scorch the leaves and cause damage to the plant. If the plant is not receiving enough light, it may not produce vibrant pink foliage. Consider placing the plant near a window that receives filtered light or using artificial grow lights to supplement natural light.

Watering Tips

It is important to water pink houseplants properly to prevent over or under-watering. The soil should be moist but not waterlogged. Over-watering can lead to root rot and other issues, while under-watering can cause the leaves to wilt and turn brown. Water the plant when the top inch of soil feels dry to the touch. Use room temperature water and avoid getting water on the leaves to prevent damage.

Soil and Fertilization

Pink houseplants prefer well-draining soil that is rich in nutrients. Use a high-quality potting mix that contains perlite or vermiculite to improve drainage. Fertilize the plant every 2-4 weeks during the growing season with a balanced liquid fertilizer. Avoid fertilizing during the winter months when the plant is dormant.

By following these care tips, pink houseplants can thrive and add a pop of color to any indoor space.

Design and Aesthetics

Pink houseplants are not only easy to care for but also add a touch of elegance to any room. When it comes to design and aesthetics, there are a few things to consider to ensure that your pink houseplants complement your existing decor.

Complementary Colors

One of the best things about pink houseplants is that they can be paired with a variety of colors to create a stunning visual display. For example, pink plants look great when paired with green foliage or white flowers. The contrast between the pink and green or white creates a visually appealing display.

Another great color to pair with pink is blue. Blue and pink are complementary colors, which means they are opposite each other on the color wheel. This contrast creates a striking visual display that is sure to catch the eye.

Placement Ideas

When it comes to placement, pink houseplants can be used in a variety of ways to enhance the overall aesthetic of a room. For example, a large pink plant can be used as a focal point in a room, drawing the eye and creating a sense of drama.

Alternatively, smaller pink plants can be used to add a pop of color to a room without overwhelming the space. For example, a small pink plant can be placed on a windowsill or on a bookshelf to add a touch of color and interest.

Overall, when it comes to design and aesthetics, pink houseplants are a versatile and beautiful addition to any room. By considering complementary colors and placement ideas, you can create a stunning visual display that is sure to impress.

Frequently Asked Questions (FAQs)

Q: What are some popular varieties of pink houseplants?

A: Some popular varieties of pink houseplants include the Pink Princess Philodendron, Pink Syngonium, Pink Fittonia, and Pink Aglaonema. These plants are known for their vibrant pink foliage and are a great addition to any indoor space.

Q: Which small pink houseplants are recommended for limited spaces?

A: For limited spaces, small pink houseplants like the Pink Polka Dot Plant, Pink Nerve Plant, and Pink Peperomia are recommended. These plants are easy to care for and can thrive in small containers.

Q: What are the top choices for large pink houseplants suitable for indoor spaces?

A: For larger indoor spaces, some top choices for pink houseplants include the Pink Rubber Plant, Pink Ficus, and Pink Dracaena. These plants can grow up to several feet tall and can add a stunning pop of color to any room.

Q: Can you list indoor plants that feature both pink and green foliage?

A: Yes, some indoor plants that feature both pink and green foliage include the Pink and Green Caladium, Pink and Green Prayer Plant, and Pink and Green Croton. These plants can add a unique touch to any indoor space.

Q: How can I care for an Aglaonema with pink variegation to maintain its vibrant color?

A: To maintain the vibrant color of an Aglaonema with pink variegation, it is important to keep it in bright, indirect light and water it regularly. Avoid overwatering and make sure the plant is not exposed to cold drafts.

Q: Which rare pink and green leaf plants are prized by collectors?

A: Some rare pink and green leaf plants that are prized by collectors include the Pink Princess Philodendron, Pink Splash Aglaonema, and Pink Syngonium. These plants can be difficult to find and are highly sought after for their unique colors and patterns.

Final Thoughts

Incorporating pink houseplants into your indoor garden introduces a vibrant burst of color that can transform any space into a lively oasis. The Philodendron Pink Princess, with its dark green leaves elegantly highlighted by bright pink variegation, stands as a testament to nature’s palette. Meanwhile, the Snow White Waffle Plant offers a delicate contrast with its bright light requirements, ensuring that its pink flowers bloom with an ethereal glow. For those seeking a subtle touch of pink, the Syngonium Pink Splash and the Pink Angel plant provide a graceful blend of dark green foliage and soft pink hues, thriving beautifully under the gentle embrace of indirect sunlight.

The Caladium Pink Symphony emerges as a masterpiece of color, its leaves a canvas of pink splashes against a dark green backdrop, embodying the essence of a pink paradise in your home. Whether placed in bright light to accentuate their vibrant colors or nestled in a cozy corner under the soft filter of indirect sunlight, these pink houseplants promise to elevate your indoor gardening experience. Each species, from the striking Philodendron Pink Princess to the enchanting Caladium Pink Symphony, invites a unique story of growth and beauty into your home, turning everyday spaces into botanical sanctuaries where the bright pink of nature’s wonders flourishes alongside the serene dark green of foliage, creating a harmonious blend that captivates and inspires.

Top 5 Best Drain Cleaners

Dealing with stubborn drain clogs can be a frustrating experience for any homeowner. These obstructions often cause slow draining sinks, unpleasant odors, and can even lead to costly plumbing repairs. Fortunately, there is a wide variety of powerful drain cleaners available to help you eliminate the most persistent clogs and maintain smooth-flowing pipes.

We’ve compiled a list of the top 5 best drain cleaners of 2024, each with unique features and capabilities. Whether it’s a clogged kitchen sink, a slow-draining bathtub, or a backed-up toilet, these products have you covered.

How to Choose the Best Drain Cleaner

When choosing the best drain cleaner for your home, consider the type of clog, the pipe material, and your personal preferences regarding eco-friendliness and product type. First, identify the cause of the clog, as hair, grease, and food particles may require different cleaners for optimal results. Next, ensure the drain cleaner is safe for your pipe material, whether it’s PVC, plastic, metal, or older systems. Some cleaners may be too harsh for specific pipe types, so always check the label.

If you’re environmentally-conscious, opt for eco-friendly, non-toxic cleaners that use enzymes or bacteria to break down organic waste. Regular maintenance with a preventative drain cleaner can help minimize future buildup and reduce blockages. By assessing your specific needs and preferences, you can confidently select the best drain cleaner for your home.

1. Green Gobbler Ultimate Main Drain Opener

Green Gobbler’s Ultimate Main Drain Opener is an excellent choice for those seeking an environmentally-friendly yet powerful solution to tackle clogged drains.

This biodegradable, non-corrosive formula effectively breaks down grease traps, hair, paper, soap scum, and other organic materials in your pipes without harming your plumbing system.

Suitable for all types of pipes, including PVC, copper, and iron, Green Gobbler’s product is perfect for eco-conscious consumers who demand top performance.

Buy on Amazon

2. Drano Max Gel Clog Remover

A household name with a proven track record, Drano Max Gel Clog Remover is a powerful solution for even the most stubborn drain clogs.

Its thick gel formula clings to clogs and dissolves hair, soap scum, and other common blockages.

Safe for use on all pipes, including PVC, plastic, metal, and older systems, Drano Max Gel is also septic-safe and won’t harm your plumbing. With a 15-30 minute wait time to clear most clogs, this is an efficient and effective option for homeowners needing quick results.

Buy on Amazon

3. Liquid-Plumr Pro-Strength Full Clog Destroyer

Liquid-Plumr’s Pro-Strength Full Clog Destroyer is a powerful and versatile option that not only tackles tough clogs but also helps maintain clear and free-flowing drains.

Its unique formula contains PipeGuard, which coats the inside of your pipes to prevent future buildup. This product is safe for use on all pipes, including PVC, plastic, and metal, as well as septic systems.

With regular use, Liquid-Plumr Pro-Strength Full Clog Destroyer can help keep your drains clear and clog-free.

Buy on Amazon

4. FlexiSnake Drain Weasel Hair Clog Tool

The FlexiSnake Drain Weasel is an excellent choice for those looking for a reusable, mechanical solution to tackle hair-clogged drains.

This 18-inch tool features a flexible, micro-hook design that easily reaches into your drain to grab and remove hair clogs. It’s an ideal solution for bathroom sink and bathtub drains, where hair buildup is a common issue.

The FlexiSnake Drain Weasel is easy to use, requires no disassembly of your plumbing, and is a cost-effective alternative to chemical drain cleaners.

Buy on Amazon

5. Bio-Clean Drain Septic Bacteria

Bio-Clean is a unique, all-natural drain cleaner that harnesses the power of bacteria and enzymes to break down organic waste in your pipes.

This eco-friendly, non-toxic formula is perfect for those looking to avoid harsh chemicals while still effectively tackling tough clogs.

Bio-Clean is safe for all types of pipes and septic systems and can be used monthly to maintain a clear and odor-free drain. With its non-corrosive formula, it’s an excellent option for those with older plumbing systems.

Buy on Amazon

Essential Drain Maintenance Tips

When it comes to clearing clogged drains, whether it’s a stubborn kitchen sink clog or a clogged sink filled with soap scum, the right approach can save you both time and money. While chemical drain cleaners offer a quick fix, they’re not always suitable for every type of pipe, especially metal pipes, or for homes with a septic tank system. It’s important to consider the nature of your plumbing and septic system maintenance needs before choosing a product.

Acidic drain cleaners are powerful, but can be too harsh for some plumbing systems. For more environmentally friendly options, hot water mixed with baking soda can effectively prevent clogs without damaging septic systems. For those tough blockages that require a bit more elbow grease, a drain snake can be a plumber’s best friend, offering a mechanical solution to clearing drains without the need for harsh chemicals.

Additionally, regular maintenance of your garbage disposal and awareness of what goes down your drain can significantly reduce the likelihood of clogs, ensuring your septic system and pipes remain in top condition. Remember, the best drain cleaners are those that not only clear clogs efficiently but also preserve the integrity of your septic systems and plumbing infrastructure.

Conclusion

A clogged drain doesn’t have to spell disaster for your home. With the right drain cleaner in your arsenal, you can tackle even the toughest clogs and keep your pipes flowing smoothly. Our top five picks for the best drain cleaners of 2023 include powerful, eco-friendly, and versatile options to suit every homeowner’s needs. From the biodegradable Green Gobbler Ultimate Main Drain Opener to the reusable FlexiSnake Drain Weasel Hair Clog Tool, these products offer reliable and effective solutions for maintaining a clear and clean plumbing system.

Remember that regular maintenance is key to preventing clogs and keeping your drains in tip-top shape. Consider using a preventative product like Liquid-Plumr Pro-Strength Full Clog Destroyer or Bio-Clean Drain Septic Bacteria on a monthly basis to help minimize buildup and reduce the likelihood of blockages. With these top drain cleaners at your disposal, you can face tough clogs with confidence and keep your home’s plumbing running smoothly.

Quick Guide: How to Relocate as Simply and Successfully as Possible

Moving is stressful. It requires extensive planning and prioritizing as you juggle an endless number of tasks. Most people find themselves overwhelmed as they try to figure out what they should be doing—and when they should be doing it. This is something we completely understand at SimpleShowing, so we created the perfect relocation guide to keep you on track and as stress free as possible.

Timing is crucial to a successful move.

Even in a perfect world, relocating and moving is never a seamless process, nor is it ever stress-free. When it comes to moving, you should always choose professional companies like Caledonia Removals to help reduce the pressure and ensure everything runs smoothly. However, the single best way to guarantee your move will be as successful (and tolerable) as possible is by creating a detailed timeline and checklist. Having a moving calendar checklist will increase your productivity and keep you from forgetting critical tasks.

Two Months Until Moving Date:

  • Start by creating a “moving binder” full of checklists, receipts, invoices, records, contacts, and other resources to help you stay organized during your move. Tailor this binder to your specific needs and refer to it frequently.
  • Decide if you are going to require help from a moving company. Now is the time to start doing some research to determine if you are going to move yourself or hire a professional crew. If you decide to hire movers, compare moving apps, contact different companies and do some price shopping. Don’t forget to read reviews and check into the company’s reputation.
  • Sort, declutter, and purge unnecessary items. This will help you decide what goes with you, what gets donated or sold, and what gets pitched out in the garbage. For bigger items, consider hiring a rubbish remover to help dispose of the junk for you. Make sure to go through every room of the house and make notes of anything that might require special packaging during the move. Handling this beforehand will help setting up your new place go much more smoothly as you’ll have less junk to store.
  • Start packing early. Last minute packers experience the greatest amount of stress,. If you start early and break it up, you will find the whole process less overwhelming. You can work slowly on this and start by packing only items that you don’t use very often. If possible, pack an entire room at a time and label boxes with the room they belong in to make it easier on yourself when you unpack. This way, you’ll know exactly where things belong without having to search through boxes to figure it out later.

Six Weeks Until Moving Date:

  • Finalize your moving arrangements. Did you decide to do it yourself or hire movers? Either way, get things booked now. If you decide to do it alone, then start shopping for a place to rent a truck for a price you are willing to pay.
  • Take measurements or review floorplans of your new place if possible. Figure out if your furniture will fit in the dimensions of your new house. If not, it might be time to do some shopping! If you do this far enough in advance, you also may be able to sell furniture that will not fit before having to deal with the work of moving it.
  • Start gathering family records, including school, family doctor, and dental records to date. Don’t forget to get your pet’s vet records also! Ask each provider to give you some referrals for where you plan to relocate. Having this part taken care of will make the load much lighter as you settle in and search for new providers.
  • Update your mailing address where applicable. Start with USPS, which allows you to save time by making the update online. Next, write down a list of all companies using your current address for billing and shipping. Contact tax agencies, your gas and electric company, and your phone, cable and internet providers. Let them know when they should stop service and your new where they can the address where they can send the final bill.

One Month Until Moving Date:

  • Finalize Travel Plans. Only one month until the big day and it is time to make specific travel plans. Book flights, reserve a car—whatever it may be just get your travel plans locked in so you have one less thing to worry about. If you need to book a flight or rent a car, doing so early can save you money. Websites like Expedia and Orbitz offer bundles if you’re looking to rent a car, book a hotel, or schedule a flight. Also, Airbnb can be an affordable option if you need to break up a long drive and are looking for an inexpensive place to stay.
  • Continue packing using a clear and concise labeling system. Separate what you consider “essential” boxes from the boxes that can be unpacked at a later date.
  • Finalize arrangements with your moving company or the rental truck company. To ensure things go smoothly on moving day, it is probably a good idea to call up your moving/rental company to confirm your dates match up with their availability.
  • Continue alerting the various businesses that you plan to move and provide a timeline.
  • Notify your employer. If you haven’t already done this, now is the time to let your employer know you are leaving and give them a change of address for your final paycheck and tax papers.

One Week Until Moving Date:

  • Finish packing all of your boxes and then get an essential suitcase packed. This suitcase should contain a week’s worth of clothes for you/family and anything else you “can’t live without” such as prescriptions, documents, money, etc.
  • If you plan to move your refrigerator, start the cleaning out process. You will want to defrost it a day or two before you move.
  • Call the moving company and double check they have the correct time and date. Check logistics to make sure you are on the same page.
  • Refill prescriptions and have enough medication for at least a week or two until you establish your new pharmacy.

The Day of the Move:

  • Wake up early to make sure you are packed before the movers arrive. You should rise early on moving day and make sure you are packed and ready for the movers. The last thing you want to do is scramble around trying to pack things when you need to be directing movers on what items to pack or packing a truck yourself.
  • Make sure necessary devices are charged. Is your cell phone charged? If not, charge it because you need to be able to make instant connections all day. Might as well grab a portable battery pack while you are at it just in case.
  • Do you have your moving essentials suitcase packed up? This should be on the top of your list!
  • Set aside payment for the moving company or truck rental. Make sure to have payment ready for the moving company. Make sure to budget for 10-15% tip which typically is paid for in cash.
  • Prepare a small box of cleaning supplies that you can easily access. This includes things like Windex, toilet bowl cleaner, dusting supplies, etc. It doesn’t matter how much you have already cleaned the house, you will have last minute messes to deal with. You may also need to do some initial cleaning when you get to your new place, so having this readily available will make your life much easier.
  • Do a final walkthrough to account for any missing items. After your possessions have been loaded up, do one final walkthrough and visit each room of the house. Remember to check any drawers or cabinets for items you may have missed.

The Aftermath:

  • Now that you are settling in, take the time to review your moving company and send thank you notes to friends and family who helped.
  • Go ahead and explore the neighborhood and get to know your neighbors!

Maximizing Relocation Assistance for a Smooth Transition

When embarking on the journey to a new city for a new job, leveraging relocation assistance can significantly streamline the moving process. Many employers offer comprehensive relocation packages that cover all the costs associated with moving, from hiring professional movers to the purchase of moving supplies such as moving boxes and a moving truck. To ensure a seamless transition, familiarize yourself with the housing market in your new location early on. This knowledge will help you budget effectively for relocation costs and find a residence that meets your needs and preferences.

Additionally, remember to update your address at the post office and explore your new surroundings, including local grocery stores and community centers. This exploration will not only help you adjust to your new environment but also provide opportunities to make new friends and build a support network. Following these relocation tips will equip you with the tools needed for a successful move, allowing you to fully embrace the excitement of starting fresh in a new city.

Save Money On Your Move.

Relocating and moving can cost a lot of money. However, by buying a home with SimpleShowing, you can get a check for $5,037 on average with the SimpleShowing Buyer’s Refund Program to help offset moving expenses, pay for closing costs for your new place or even cover the price of new appliances.

Relocating is expensive, stressful, and exhausting—and we think you deserve a break. Print out this quick, relocation guide as a checklist to make your move feel less like a juggling act, and more like the exciting, life transition that lies ahead.

For more tips related to moving and buying a home, keep reading below:

How to Remove a Ceiling Fan Like a Pro

In this blog, we’ll walk you through removing a ceiling fan without damaging it or yourself! With straightforward instructions and a few basic tools, you can be on your way to successfully remove a ceremony time!

Tools for Removing a Ceiling Fan

To remove a ceiling fan successfully, you’ll need a few tools and materials, including:

●   Electric drill

●   Screwdriver

●   Wire cutters

●   Pliers

●   Safety glasses

●   Gloves

●   Ladder

Step-by-Step Instructions On How To Remove Ceiling Fans

Follow these step-by-step instructions, and you’ll be able to get the job done quickly, safely, and with minimal effort!

1.   Turn Off The Electricity

Ensure you turn off the power from your breaker box to avoid any potential electrical shocks.

2.   Unscrew Mounting Bracket

If necessary, unscrew any mounting brackets or screws securing the fan in place so it can be taken down.

3.   Take Down Any Decorative Fixtures Or Hardware

If your fan has any light fixtures or other decorative hardware attached, carefully take these down before attempting to remove the entire unit.

4.   Remove The Blade Arms And Blades From The Motor Unit

Gently loosen and unscrew each blade arm to be removed from the motor unit. Also, make sure to news or components holding the fan blades in place.

5.   Disconnect Wiring And Switches

Disconnect all wires and buttons associated with your old ceiling fan before removing it, so there’s no risk of electric shock during removal. This is also a good time to decide if you want to add a 3-way switch to control your fan from two places.

6.   Remove The Fan Motor Unit From The Base Plate And Remove It From The Ceiling Joists

Once all of this is done, you can then begin to carefully lift the fan motor unit from its base plate while also taking care not to damage any of your surrounding walls or ceilings while doing so. Then, gently slide it out of its ceiling joists until completely removed from its original installation spot!

7.   Double Check For Anything That Needs To Be Disconnected, Removed, Or Replaced Before Finishing Up

Before completing your ceiling fan removal process, double-check for any remaining pieces (such as screws, fan wires or an electrical box) that need to be disconnected or replaced; this will help ensure everything is successfully taken down without any further issues arising in future installations!

Safety Tips For Avoiding Any Accidents

Removing a ceiling fan is not always easy; it requires caution and preparation for it to go smoothly without causing any harm whatsoever to your property, let alone yourself!

Here are some safety tips for avoiding accidents:

●   Wear protective gear such as gloves and eyewear when handling tools such as electric screwdrivers during installation or removal.

●   Don’t forget safety basics, such as turning off power sources before beginning work. When dealing with any type of light fixture or outlet, it’s important to know the basic types of electrical wiring, particularly “hot” wires.

●   Read through each step of an instruction manual thoroughly before attempting a DIY project like this one!

Important Reminders

Removing a ceiling fan, whether it’s a flush mounted ceiling fan, a downrod ceiling fan, or a new ceiling fan you’re planning to replace, requires careful attention to detail and safety. Many ceiling fans are secured by screws holding them in place and connected through wire nuts to the ceiling wires.

Before attempting to remove any fan, turn off the power at the circuit breaker to ensure safety. Use a voltage tester to confirm there’s no electricity running to the fan. If your fan includes a light kit, carefully disconnect it before unscrewing the fan from its mount.

Whether you’re replacing an old fan with a new fan or simply removing a ceiling fan for maintenance, understanding the specific type of fan you’re working with is crucial for a safe and efficient removal process.

Conclusion

Though removing ceiling fans may seem intimidating at first glance, following these step-by-step instructions on how to take down a ceiling fan is simple – especially when combined with safety tips that prevent accidents or damage along the way!

With just a few basic tools and knowledge on how to properly install or remove ceiling fan, anyone can accomplish this task efficiently; all it takes is some preparation beforehand, along with making sure all steps are followed correctly every single time – plus being extra careful throughout each stage – for maximum effectiveness and results!

Top 9 Best Kitchen Sinks to Revamp Your Cooking Space

Your kitchen is the heart of your home. It’s the place where family and friends gather to prepare delicious meals, share stories, and make lasting memories. One of the most essential elements of any kitchen is the sink. A high-quality kitchen sink not only serves as a practical workspace but also adds a touch of elegance and style to your cooking area.

In this article, we’ve compiled a list of the top 10 best kitchen sinks in 2023 to help you make an informed decision and choose the perfect addition to your home.

Top 10 Best Kitchen Sinks in 2023

1. Kraus Standart PRO 32-inch Undermount Single Bowl Stainless Steel Kitchen Sink

The Kraus Standart PRO is a top-of-the-line undermount kitchen sink that boasts a sleek design and incredible durability. Made with premium T304 stainless steel, this 16-gauge sink features a spacious single bowl and is equipped with NoiseDefend™ soundproofing technology to minimize noise during use. The commercial-grade satin finish is not only stylish but also easy to clean.

View on Amazon

2. Ruvati 33-inch Workstation Ledge Drop-in Tight Radius Kitchen Sink

Ruvati’s workstation ledge sink is the ultimate multitasker, offering an integrated cutting board, colander, and roll-up drying rack for added functionality. Made from 16-gauge T304 stainless steel, this drop-in sink features tight radius corners for a modern look and easy cleaning. The brushed finish hides scratches and adds a touch of sophistication to your kitchen.

View on Amazon

3. Blanco Performa Anthrocite Super Single Bowl Kitchen Sink

This elegant granite composite sink from Blanco offers a unique design, with a low divide that separates a smaller prep area from the main basin. Its non-porous surface is resistant to stains, scratches, and heat, making it a durable choice for busy kitchens. Available in various colors, the Performa Cascade is an attractive and functional addition to any home.

View on Amazon

4. Elkay Quartz Classic ELGRU13322GS0 Greystone Single Bowl Undermount Sink

The Elkay Quartz Classic is a stunning undermount sink that combines style, durability, and functionality. Made from a quartz composite material, this sink is resistant to stains, scratches, and impact. The non-porous surface is easy to clean and doesn’t harbor bacteria, while the Greystone color adds a unique touch to your kitchen decor.

View on Amazon

5. ZUHNE Modena 28-Inch Undermount Single Bowl Kitchen Sink

Zuhne’s Modena sink offers both style and performance, with its 16-gauge T304 stainless steel construction and satin finish. The undermount design provides a seamless look, while the extra-deep basin accommodates large pots and pans with ease. Zuhne’s proprietary insulation technology ensures a quiet and comfortable kitchen experience.

View on Amazon

6. KOHLER Whitehaven Farmhouse Self-Trimming Apron Front Kitchen Sink

The KOHLER Whitehaven is a classic farmhouse sink that adds a touch of vintage charm to your kitchen. Made from durable cast iron with an enamel finish, this self-trimming apron front sink is designed for easy installation and long-lasting beauty. The spacious single bowl accommodates large cookware, while the sloped bottom helps with draining and cleanup.

View on Amazon

7. Sarlai 33-inch Farmhouse Apron Front Stainless Steel Kitchen Sink

Sarlai’s farmhouse apron front sink combines the charm of a classic farmhouse design with the durability of stainless steel. This 16-gauge T304 stainless steel sink features a brushed finish that’s easy to clean and resists scratches. The single bowl design offers ample space for washing and rinsing, while the X-shaped grooves facilitate water drainage.

View on Amazon

8. Bocchi Classico Fireclay Farmhouse Apron Front Kitchen Sink

The Bocchi Classico is a beautiful fireclay farmhouse sink that adds a touch of elegance to any kitchen. Made from high-quality fireclay, this sink is resistant to heat, stains, and scratches. The apron front design provides a classic look, while the single bowl offers ample space for washing and rinsing. Available in various colors, the Bocchi Classico is a versatile choice for any kitchen.

View on Amazon

9. HOUZER Glowtone Series Undermount Stainless Steel Kitchen Sink

The HOUZER Glowtone Series offers a clean design with an interchangeable dual mount sliding platform system without losing any workspace on the kitchen counter. Made from 20-gauge T304 stainless steel, this sink is designed to withstand daily use and maintain its appearance. The brushed satin finish adds a touch of style, while the StoneGuard™ undercoating reduces noise and condensation.

View on Amazon

Additional Considerations

As you decide on the best kitchen sink for your home, keep in mind other important factors that can influence your choice. These include:

Size and Dimensions

Measure your kitchen space to ensure the sink you choose will fit properly. Consider the depth and width of the sink, as well as the cabinet size required for installation.

Installation Type

Kitchen sinks come in various installation types, such as undermount, topmount (drop-in), and apron front (farmhouse). Each type has its own unique look and installation requirements, so make sure to choose the one that best suits your kitchen design and needs.

Number of Bowls

Single and double bowl sinks are the most common options. Single bowl sinks provide more space for washing large pots and pans, while double bowl sinks offer separate areas for washing and rinsing or other tasks. Consider your cooking habits and preferences when choosing between these options.

Faucet and Accessories

Some sinks come with pre-drilled holes for faucet and accessory installation. Make sure to choose a sink that accommodates your desired faucet and any additional accessories, such as soap dispensers or side sprayers.

Maintenance and Care

Different sink materials require varying levels of maintenance and care. Stainless steel sinks are generally low-maintenance and resist stains and scratches, while fireclay and cast iron sinks may require more care to maintain their appearance. Consider the upkeep required for your chosen sink material.

Enhancing Functionality and Aesthetics with Workstation Sinks

When revamping your kitchen, selecting the right sink is crucial for blending functionality with style. Workstation sinks, particularly those featuring a single bowl sink design, are gaining popularity for their efficiency and versatility. Unlike traditional sink basins, these innovative models come with an integrated ledge that allows for the attachment of accessories, such as cutting boards and colanders, transforming your sink into a multifunctional workspace.

Whether you opt for a top mount sink or an undermount sink, the gently sloped sink bottom ensures optimal drainage, preventing water from pooling and facilitating easier cleaning. For those who use a garbage disposal, selecting a single bowl sink with an offset drain can significantly enhance functionality, providing more space under the sink and improving the efficiency of waste disposal.

With options ranging from the sleek, modern look of double basin sinks to the practicality of double bowl sinks, there’s a workstation sink to suit every kitchen’s needs. The right choice will not only make it easier to wash dishes but also add a touch of sophistication to your kitchen’s overall design. Including mounting hardware and considering the sink surface are also important factors; a drop-in kitchen sink offers ease of installation and maintenance, making it a popular choice for many homeowners.

Conclusion

When it comes to selecting the best kitchen sink for your home, there are plenty of options to choose from. Whether you prefer the classic charm of a farmhouse sink, the sleek modern look of stainless steel, or the unique elegance of granite composite, you can find the perfect sink to complement your kitchen’s design and functionality.

A well-chosen kitchen sink can transform the way you tackle dirty dishes and optimize your kitchen’s overall functionality. From the rustic charm of farmhouse sinks and the convenience of drop-in sinks to the versatility of workstation sinks, there’s a perfect option for everyone. Whether you prefer the practicality of a double basin sink or the spaciousness of a single basin sink, washing dishes will become a more enjoyable task. With various materials like enameled cast iron, top mount stainless steel, and even elegant copper sinks, you can find the ideal sink that complements your kitchen’s aesthetic.

Moreover, a spacious sink combined with smart features like an integrated bamboo cutting board can help you maximize counter space, making your kitchen experience more seamless and efficient. So, consider the benefits of single basin sinks, double basin sinks, and other options as you invest in one of these top-rated kitchen sinks, you can ensure a beautiful and practical addition to your home for years to come.

How To Find An HOA Management Company

Homeowners associations (HOAs) are organizations that maintain and manage common areas and enforce rules in condominium, townhome, and housing developments. As an HOA board member, finding the right management company to handle daily operations and long-term governance is an important decision. Here’s how you can find an HOA management company that’s a good fit near Charlotte and beyond.

1. Research Management Company Options

The first step is researching potential management companies to partner with. Look for an HOA management company near Charlotte or options that service your geographical area. You’ll want to gather information on several providers to compare services and costs. Look for HOA management companies that have proven experience working with developments like yours. Check online reviews and talk to people you know who have insight into working with management companies.

When researching, look for HOA management companies that provide a full suite of services. Typical services include financial management, maintenance coordination, board support, and resident communications. Make sure the company has the systems and staff available to handle every aspect of HOA management based on the size of your development.

2. Interview Management Companies

Once you’ve identified several potential HOA management partners, take the next step to interview them. This allows you to evaluate which company would be the best match for your property and residents. Come prepared with a list of questions based on the specific needs of your HOA.

Ask about their experience with developments similar to yours. How many communities do they currently manage? What is their client retention rate? Get a sense of their financial management processes. Will they provide transparent reporting?

Also, ask how they handle maintenance, vendor relationships, and emergencies. What communication platforms and frequency can residents expect? Make sure to inquire about their fee structure and get references from current clients. Interviews allow you to gauge responsiveness and identify the management company that fits best.

3. Compare Service Plans

Take time to compare service plans and costs across the HOA management companies you interviewed. Look at the complete range of services included in their base fees compared to any add-on costs. If basic services like financials, maintenance coordination, and resale compliance are lumped into add-ons, costs can quickly increase.

Also, look at how they structure their fees. Some charge a percentage of monthly assessments, while others charge a flat monthly fee. Calculate total estimated costs based on your HOA’s budget and units to determine the best value. Make sure you understand exactly what you’re getting for the fees and that billing is transparent. Comparing plans allows you to find cost-effective services.

4. Check Credentials

Importantly, verify credentials and licenses when selecting an HOA management partner. Look for companies accredited by recognized institutions like the Community Association Institute and the National Board of Certification for Community Association Managers. You want assurance you’re working with an ethical, professional HOA management firm.

Ask for representative bios and verify required state and local licenses. Research what training programs and designations employees hold to confirm expertise. Check registrations with the Secretary of State to make sure there are no concerning regulatory issues. Don’t risk partnering with a non-credentialed company to manage your HOA.

5. Think Long Term

As you evaluate HOA management companies, think beyond the present to establish a lasting partnership. Consider not just the company’s ability to support your current board but also how they’ll communicate with and educate future resident leaders. Will their systems provide continuity when board members transition?

Also, look at their solutions for your HOA’s evolving needs, whether growing your reserves, enhancing amenities, or handling major projects. Select a management company interested in seeing your community thrive for years to come.

6. Trust Your Instincts

With research and due diligence, one HOA management company will rise to the top. Go with your gut feeling after getting to know each provider during the search process. Which one understood your goals? Which one do you feel you can trust? Which one exhibited responsive communication every step of the way?

Finding an HOA management company comes down to choosing a true partner to rely on. Be confident in the selection process and criteria that matter most to your HOA. Ultimately, trust your instincts to pick the management company that’s the ideal fit.

Conclusion

Selecting an HOA management company is an important decision that affects home values, community upkeep, and residents’ experience. Take time to thoroughly research and compare providers based on cost, credentials, services, and responsiveness. Interview multiple companies to find one that aligns with your HOA’s unique needs and priorities both now and in the future. With due diligence, you can partner with an HOA management company that becomes an invaluable asset.