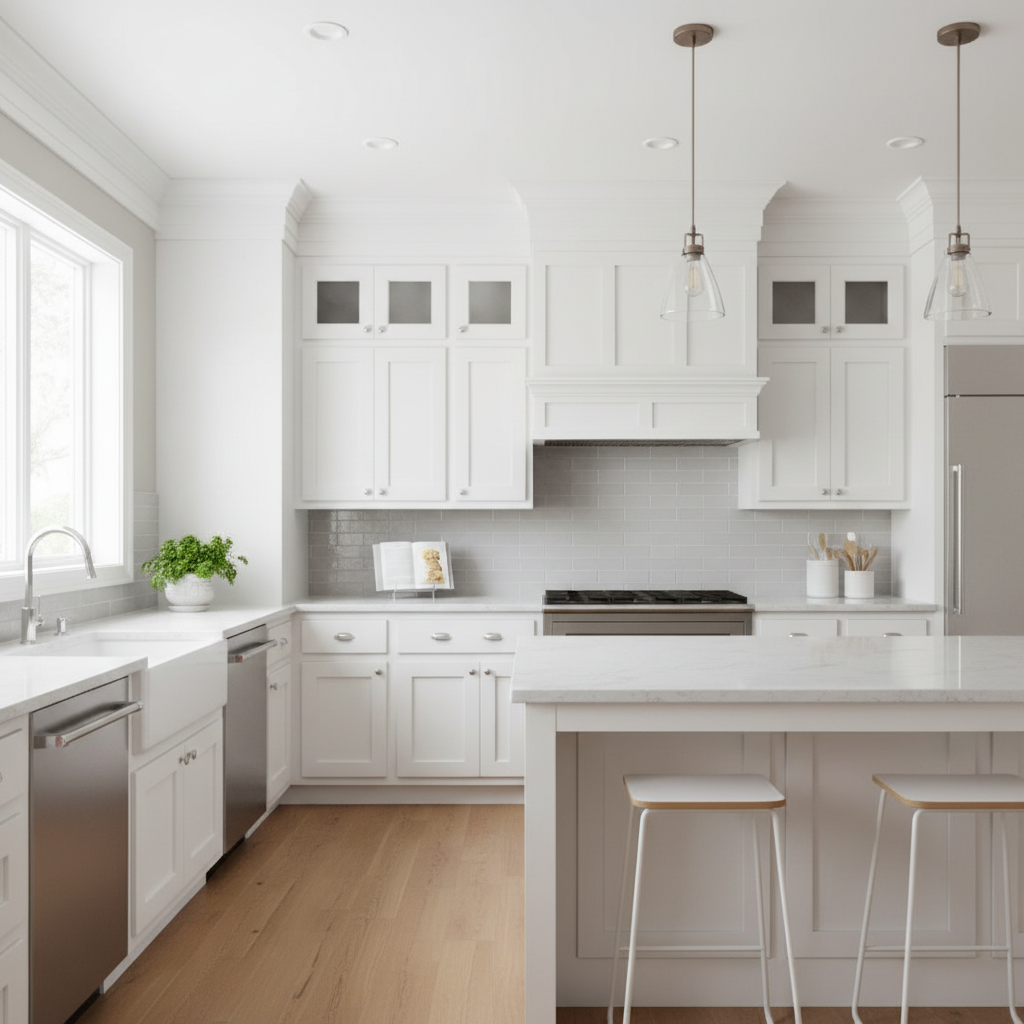
Adding crown molding on top of kitchen cabinets is a popular design choice that can significantly elevate the look and feel of your kitchen. Whether you’re planning a full renovation or just looking for a cost-effective way to refresh your space, this detail can transform ordinary cabinets into a more custom, finished, and elegant feature. It’s not just about aesthetics; crown molding can also bridge gaps, hide imperfections, and even make your ceilings appear taller. Let’s explore everything you need to know about incorporating this classic architectural element into your kitchen design.
Why Add Crown Molding on Top of Kitchen Cabinets?
You might be wondering if adding crown molding to your kitchen cabinets is truly worth the effort and expense. The answer, for many homeowners, is a resounding yes. This seemingly small detail offers a surprising number of benefits that go beyond just making things look pretty.
Enhanced Aesthetic Appeal and Custom Look
One of the primary reasons homeowners choose to add crown molding is for its visual impact. It creates a polished, custom-built appearance that can make stock or semi-custom cabinets look much more high-end. Think of it as the finishing touch that ties everything together, much like a frame completes a painting. Without crown molding, the tops of your cabinets can look unfinished, especially if there’s a gap between the cabinet and the ceiling. The molding bridges this gap, creating a seamless transition and a more architectural feel.
- Elevated Style: It instantly upgrades the perceived value and sophistication of your kitchen.
- Cohesive Design: Helps integrate your cabinets with the rest of your kitchen’s architectural elements, especially if you have crown molding elsewhere in your home.
- Custom Feel: Makes standard cabinets appear built-in and bespoke, rather than off-the-shelf.
Concealing Gaps and Imperfections
Let’s face it, very few homes have perfectly level ceilings or walls. Gaps between the top of your cabinets and the ceiling are common, and they can be an eyesore. Crown molding is an excellent solution for concealing these discrepancies. It effectively hides uneven lines, small construction flaws, and the inevitable dust and grime that accumulates in those hard-to-reach spaces. This means less cleaning in those awkward spots and a much cleaner, more professional finish.
Making Ceilings Appear Taller
This might sound counterintuitive, as crown molding adds a physical element below the ceiling line. However, when installed correctly, crown molding can actually create an optical illusion that makes your ceilings appear taller. By drawing the eye upward and creating a visual break where the wall meets the ceiling (or in this case, where the cabinet meets the ceiling), it can give the impression of greater height and more expansive space. This is particularly effective in kitchens with standard ceiling heights (e.g., 8 or 9 feet).
Increased Home Value and Appeal
While it’s a relatively small detail, a beautifully finished kitchen with custom touches like crown molding can contribute to your home’s overall market value and appeal. When potential buyers walk into a kitchen that looks thoughtfully designed and meticulously finished, it leaves a strong positive impression. This can be a differentiating factor in a competitive market, potentially leading to a quicker sale or a better offer. For more insights on how home improvements impact value, you might find our blog on home valuations helpful: SimpleShowing Blog.
Choosing the Right Crown Molding for Your Kitchen Cabinets
Once you’re convinced that crown molding is the right choice for your kitchen, the next step is to select the perfect style and material. This decision should align with your kitchen’s overall aesthetic, your budget, and the practicalities of installation.
Understanding Different Styles and Profiles
Crown molding comes in a vast array of profiles, from simple and understated to ornate and elaborate. The key is to choose a style that complements your existing kitchen cabinets and the architectural style of your home.
- Traditional/Classic: Often features intricate curves, multiple layers, and decorative elements like coves, ogees, and beads. This style pairs well with shaker, raised panel, or traditional European cabinet styles.
- Transitional: A blend of traditional and contemporary, offering cleaner lines than traditional but still with some curves or stepped profiles. It’s a versatile choice for many modern homes.
- Modern/Contemporary: Characterized by very clean, simple lines, often with a flat or slightly angled profile. Sometimes referred to as “cove” or “flat stock” molding, it suits slab-style cabinets and minimalist designs.
- Shaker Style: While not a molding profile itself, if your cabinets are Shaker, you’ll likely want a simple, clean-lined crown molding that doesn’t overpower the cabinet’s understated elegance. A stepped or simple cove profile often works best.
Consider the scale of your kitchen and cabinets. In a large kitchen with tall ceilings, you can opt for a wider, more substantial crown molding. In a smaller kitchen or with shorter ceilings, a narrower, less imposing profile might be more appropriate to avoid overwhelming the space.
Material Options for Crown Molding
The material you choose will affect the cost, durability, and finishing options for your crown molding.
- Solid Wood:
- Pros: Durable, can be stained or painted, offers a high-end look, and can be custom-milled. Popular choices include pine, oak, maple, and poplar.
- Cons: More expensive than other options, can be prone to warping or splitting if not properly acclimated, and more challenging to install for DIYers.
- MDF (Medium-Density Fiberboard):
- Pros: More affordable than solid wood, very stable (less prone to warping), smooth surface ideal for painting, and easier to cut and install.
- Cons: Not suitable for staining, can swell if exposed to moisture, and less durable than solid wood (can dent more easily).
- Polyurethane:
- Pros: Lightweight, moisture-resistant, very durable, pre-primed and ready for paint, and available in intricate designs at a lower cost than wood.
- Cons: Can be more expensive than MDF, less impact-resistant than wood, and can look less authentic if not painted well.
- PVC:
- Pros: Excellent for high-moisture areas, very durable, rot-proof, and low maintenance.
- Cons: Limited styles, can be more expensive, and typically only suitable for painting.
For kitchen cabinets, MDF or solid wood (poplar is a good paint-grade option) are often the most common choices due to their appearance and ease of finishing to match cabinets.
Matching or Contrasting with Your Cabinets
This is a crucial design decision. Most commonly, crown molding on top of kitchen cabinets is painted or stained to match the cabinets exactly. This creates a seamless, built-in look that extends the visual height of the cabinets. However, you can also choose to:
- Match Trim Throughout the Room: If you have existing crown molding in your kitchen or adjacent rooms, you might choose to match its color and style, especially if your cabinets are white or a neutral color.
- Contrast: Less common for cabinet crown molding, but you could paint it a contrasting color to create a bold statement. This works best in very modern or eclectic designs and requires careful planning to ensure it doesn’t look disjointed.
For a classic, timeless look that enhances perceived ceiling height and cabinet elegance, matching the cabinet color is usually the safest and most effective approach.
Installation Methods for Crown Molding on Top of Kitchen Cabinets
Installing crown molding can be a satisfying DIY project, but it does require precision and the right tools. There are a few common methods, depending on whether your cabinets reach the ceiling or if there’s a gap.
Method 1: Cabinets Reach the Ceiling (or Close to It)
If your cabinets are very close to the ceiling (within an inch or two), the installation is relatively straightforward. The crown molding will typically be installed directly onto the top edge of the cabinet face frame and angled up to meet the ceiling. This creates a clean, finished look without needing filler pieces.
Steps:
- Measure and Cut: Measure the length of each cabinet run. Cut the crown molding pieces to size, paying close attention to inside and outside corners. This usually involves compound miter cuts, which can be tricky. A miter saw with a good blade is essential.
- Test Fit: Before fastening, dry-fit each piece to ensure a snug fit at the corners and against the ceiling/cabinet.
- Attach to Cabinets: Use finishing nails (either by hand or with a nail gun) to secure the molding to the top face frame of the cabinets. Aim for the thickest part of the cabinet frame for a secure hold.
- Attach to Ceiling (Optional/If Applicable): If the molding touches the ceiling, you can also nail it into ceiling joists if you can locate them, or use construction adhesive for added security.
- Fill and Finish: Fill all nail holes with wood putty, caulk any gaps between the molding and the ceiling/cabinet, then sand and paint/stain to match your cabinets.
Method 2: Cabinets with a Gap to the Ceiling
This is a very common scenario. If there’s a significant gap (more than a couple of inches) between the top of your cabinets and the ceiling, you’ll need to use a “filler” or “riser” piece to bridge this space before adding the crown molding. This creates the illusion that your cabinets extend all the way to the ceiling.
Steps:
- Install Filler Strips/Soffits:
- Measure the gap between the cabinet top and the ceiling.
- Cut strips of wood (often 1x2s or 1x3s, or custom-cut plywood) to fit horizontally along the top of your cabinets, extending upward to fill most of the gap.
- Attach these strips securely to the top of the cabinet boxes from the inside, using screws. Ensure they are level and plumb.
- You can also create a small “soffit” or box frame on top of the cabinets using plywood or MDF to fully enclose the gap, which provides a solid surface for the crown molding.
- Install Crown Molding on Filler:
- Once the filler strips or soffit are in place, the crown molding is installed onto the top edge of the filler piece, angling up to meet the ceiling.
- Follow the same measuring, cutting, and fastening steps as in Method 1, securing the molding to the filler strips/soffit.
- Fill and Finish: As before, fill nail holes, caulk gaps, and paint/stain to match.
Tools and Materials You’ll Need
For a successful installation, gather these essential tools and materials:
- Miter Saw: Crucial for accurate angle cuts. A compound miter saw is ideal.
- Measuring Tape and Pencil: For precise measurements.
- Stud Finder: To locate ceiling joists if you’re nailing into the ceiling.
- Level: To ensure your filler strips and molding are straight.
- Nail Gun (Brad or Finish Nailer): Speeds up installation and creates smaller holes than hand-nailing.
- Finishing Nails: Appropriate length for your molding and substrate.
- Wood Glue or Construction Adhesive: For extra hold, especially at mitered joints.
- Wood Putty/Filler: To fill nail holes.
- Caulk: To seal gaps between molding, cabinets, and ceiling.
- Sandpaper: For smoothing putty and edges.
- Paint/Stain and Brushes: To finish the molding.
- Safety Glasses: Always protect your eyes when cutting.
Tips for DIY Installation
- Practice Cuts: Crown molding cuts can be tricky due to the compound angles. Practice on scrap pieces until you get the hang of it.
- Coping Saws for Inside Corners: While miter cuts work for inside corners, coping them often results in a tighter, more professional fit that is less susceptible to movement over time.
- Measure Twice, Cut Once: This old adage is especially true for molding.
- Use a Helper: Long pieces of molding are much easier to handle and install with an extra set of hands.
- Don’t Rush the Finishing: The caulk and paint/stain are what truly make the installation look professional. Take your time with these steps.
Common Challenges and Solutions
Even with careful planning, you might encounter a few hurdles when installing crown molding on top of kitchen cabinets. Knowing how to address them can save you time and frustration.
Uneven Ceilings or Walls
This is perhaps the most common challenge. Few homes have perfectly flat ceilings or plumb walls, which can lead to gaps between the molding and the surface.
Solution:
- Caulk: For small gaps (up to about 1/4 inch), a good quality paintable caulk is your best friend. Apply a bead and smooth it with a wet finger or caulk tool.
- Shims: For larger gaps, you might need to strategically place thin wood shims behind the molding before nailing it, then caulk over the shims.
- Sanding/Planing: In some cases, if the molding is slightly proud in one spot, you might be able to carefully sand or plane down the back edge to help it sit flush.
Tricky Corner Cuts
Getting mitered or coped corners to meet perfectly can be frustrating, especially for beginners.
Solution:
- Practice: As mentioned, practice on scrap pieces.
- Coping: Learn to cope inside corners. While more time-consuming, a coped joint looks cleaner and is more forgiving than a mitered joint when walls aren’t perfectly 90 degrees.
- Test Fit Extensively: Don’t nail anything permanently until you’ve dry-fitted the corner pieces and are satisfied with the fit.
- Wood Glue and Clamps: For mitered joints, applying wood glue to the cut edges before joining and clamping them tightly can help create a strong, seamless bond.
Matching Existing Finishes
If you’re adding crown molding to existing cabinets, matching the paint or stain can be difficult.
Solution:
- Take a Sample: If possible, remove a small, inconspicuous piece of your cabinet (like a drawer front or a small trim piece) and take it to a paint or stain specialist for color matching.
- Test Swatches: Buy small samples of potential matches and test them on scrap wood or an inconspicuous area before committing.
- Consider a Full Repaint: If your cabinets are older or the finish is worn, this might be the perfect opportunity to repaint all your cabinets and the new crown molding for a completely fresh, uniform look.
Dealing with Obstructions (e.g., Vents, Light Fixtures)
Sometimes, existing elements like range hood vents, under-cabinet lighting wires, or even ceiling light fixtures can interfere with crown molding installation.
Solution:
- Notch or Cut Out: Carefully measure and cut notches or holes in the crown molding to accommodate these obstructions. Use a jigsaw or oscillating tool for precision.
- Plan Ahead: If you’re doing a full kitchen reno, plan the placement of these elements with crown molding in mind.
Beyond the Basics: Creative Crown Molding Ideas
While a simple crown molding on top of kitchen cabinets is a classic choice, there are ways to get creative and make an even bigger statement.
Stacking Molding for a Grander Look
Instead of just one piece of crown molding, consider “stacking” multiple pieces to create a more elaborate and substantial profile. This is particularly effective in kitchens with high ceilings or very large cabinets, where a single piece of molding might look too small. You can combine a base molding, a flat filler strip, and a crown molding to build a custom, multi-layered look that truly mimics high-end custom cabinetry.
Integrating Lighting
For an extra touch of elegance and functionality, you can integrate lighting into your crown molding. This is often done by creating a small recess or channel behind the molding to house LED strip lights. These lights can provide a soft, ambient glow that highlights your ceiling or creates a warm, inviting atmosphere in the kitchen. This is best planned during the initial installation phase to ensure proper wiring and concealment.
Using Crown Molding on Other Cabinetry
Don’t limit crown molding to just your upper kitchen cabinets. Consider extending this elegant detail to other built-in cabinetry in your home, such as:
- Pantry Cabinets: If you have a built-in pantry, adding crown molding can make it feel like a seamless part of your kitchen’s architecture.
- Built-in Bookcases or Shelving: Crown molding can give these units a custom, high-end furniture look.
- Bathroom Vanities: For a touch of luxury, crown molding can elevate a standard bathroom vanity.
Consistency in design elements like crown molding throughout your home can create a cohesive and sophisticated aesthetic.
Is Crown Molding on Top of Kitchen Cabinets Right for You?
Deciding whether to add crown molding to your kitchen cabinets ultimately comes down to your personal style, budget, and the overall vision you have for your kitchen. It’s a detail that can significantly impact the final look, transforming a functional space into a truly stunning one.
If you’re looking for a way to:
- Add a touch of elegance and sophistication.
- Make your cabinets look more custom and built-in.
- Conceal imperfections or gaps near the ceiling.
- Potentially increase your home’s appeal and value.
Then crown molding is definitely a feature worth considering. While it requires careful planning and execution, the finished result is often a kitchen that feels more complete, luxurious, and uniquely yours. Whether you choose to tackle it as a DIY project or hire a professional, this architectural detail is a timeless addition that can bring lasting beauty to your home.